Pumpkin Dinner Rolls
These pumpkin dinner rolls, shaped like mini pumpkins, are soft, fluffy, and packed with pumpkin flavor. Easy and fun to make with the family, they’re the perfect addition to your Halloween party or Thanksgiving feast!

I’m bringing this beloved pumpkin dinner rolls recipe back just in time for Thanksgiving 2025 — it’s still the softest, most festive rolls you’ll ever bake.
Playing with food can be so much fun, and these Pumpkin Dinner Rolls were a joy to make! The best part? You get to enjoy them fresh from the oven.

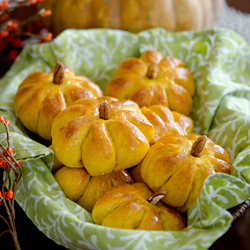
Pumpkin makes the perfect addition to dinner rolls for the fall season. These rolls even look like little pumpkins, adding a festive touch to your Thanksgiving table.
The dough is a bit sticky, which helps create soft, fluffy rolls. Using canned pumpkin purée gives them a beautiful golden color and keeps things simple. To shape them like mini pumpkins, you just score the edges and use pecan halves for stems.
It’s easier than you might think, and it’s a fun activity to do with the family—kids will love helping out! Celebrate autumn with these adorable pumpkin dinner rolls, one of the most popular Western recipes on my site. Perfect for your Thanksgiving spread!
If you’ve got a fresh pumpkin and want a Korean twist, try my Korean pumpkin salad or creamy pumpkin porridge. Both make beautiful fall dishes—just like these dinner rolls
How to make Pumpkin Dinner Rolls

Heat milk to scalding hot, add butter and let the butter melt. Add sugars, pumpkin and salt; stir everything well.

Combine yeast, 1 tsp sugar and warm water in another small bowl and let the yeast to proof (about 5 minutes). Add it to the pumpkin mixture with an egg; mix well.

Gradually add the flour and stir with a wooden spoon.

Time to knead! I used my mixer to do the job. Knead until the dough pull itself from the side of the bowl, about 5 minutes.

Dump the dough on the lightly floured surface and knead with your hand for 1 minute.

Form the dough into a ball and place in a greased bowl. Cover and let it rise in a warm place until they get double in volume.

Here is the beautifully risen dough. Love the deep yellow color!

Give it a punch to deflate. The moment I’ve been waiting for…

Divide the dough in half. Roll each half to make a log and cut each log in 15 pieces or more if you prefer smaller rolls.
Shaping into mini pumpkins

Form each piece into a ball by pulling it together…

Press down gently with your hand.

Using a knife, give 8 segments of cut on the edge but leave the center uncut.

Poke deeply on the center of pedal with your pinkie.

Let them rise again. The center indentation somehow disappeared but you can always poke them again. You gotta love poking!

Brush with egg wash to give a golden look.

Bake them in the preheated 350˚F oven for 9-12 minutes. Don’t over-bake.

Brush with melted butter for a little shine. And the final touch? Use a sliced pecan piece as a stem! Cute, aren’t they?
Imagine the turkey in all its glory, surrounded by delicious fall side dishes on the Thanksgiving table. Now picture these adorable mini pumpkin rolls being passed around, bringing smiles to everyone’s faces.
In this season of gratitude, there’s so much to be thankful for—family, friends, laughter, and even the challenges that life brings. I hope these mini pumpkin dinner rolls add a special touch to your next Thanksgiving feast!
Freezing Tip
Put leftover rolls in a zipper bag and freeze up to 3 months. To reheat, bring the rolls to a room temperature first. Then warm up in the preheated 350˚F oven for 4-5 minutes or until hot to touch.

Helpful Tips and Tricks
- Using fresh pumpkin instead of canned purée: I recommend steaming the pumpkin rather than boiling it. Mash the steamed pumpkin and follow the recipe, adjusting the liquid to manage the dough’s moisture.
- Making the dough ahead: Let the dough rise in the fridge overnight. The next day, bring it to room temperature and continue with the recipe.
- Using instant yeast instead of active dry yeast: Instant yeast can be mixed directly with the flour—no proofing needed. Just ensure your liquid is lukewarm to avoid killing the yeast.
- Nut allergy? Use mini pretzel sticks, broken into small pieces, instead of pecan stems for a fun alternative.
Love this recipe? Rate it and share your experience in the comments below! On Instagram? Tag me to showcase your creation. For more delicious recipes, subscribe to our newsletter!
Pumpkin Dinner Rolls
Ingredients
- 3/4 cup whole milk, scalded
- 6 tbsp butter, softened
- 1/3 cup light brown sugar
- 1/3 cup white sugar
- 1 cup canned pumpkin puree
- 1 tsp salt
- 1/4 cup lukewarm water
- 2 envelope (about 4 1/2 tsp) active dry yeast
- 1 tsp white sugar
- 1 egg
- 5 cup + a little extra all-purpose flour
- 10 pecan halves, sliced into 3 vertical sections
- 1/4 cup melted butter
Instructions
- Pour hot milk in a large mixing bowl, add butter and stir to melt. Add sugars, pumpkin puree, salt to the milk and butter mixture; mix well.
- In a small bowl, combine lukewarm water, yeast, and 1 tsp sugar. Wait 5- minute for yeast to proof. When it gets foamy, add it to the pumpkin mixture, and add the egg; mix well. Add the flour gradually and mix with a wooden spoon until well combined. The dough will be sticky.
- Using electric mixer with a dough hook attached, beat the mixture on the low-speed setting until the dough itself pulls from the side of the bowl, about 5 minutes. You can add a little more flour if the dough seems too wet.
- Turn the dough out to a wooden board dusted with a little flour. Knead with hand for 1 minute. Form the dough into a ball shape, place in a greased bowl and cover with a cloth. Let it rise in a warm place until it doubles in volume, about 1 hr.
- Punch the dough to deflate. Knead the dough for a few seconds on a wooden board. Divide the dough into half and cut each dough half into 15 pieces, total of 30 pieces.
- Roll each dough piece into a ball shape with your hand. Flatten the piece with palm of your hand a little. Using a knife, give 8 cuts on the edge to mimic flower pedals but leave the center uncut.
- Poke the center with your finger to give a deep indentation. Repeat the same procedure to the remaining pieces.
- Place them, 2-inch apart, on a baking sheet lined with parchment paper or baking mat. Let them rise again until they become double in volume, about 45 minutes.
- Preheat oven 350ºF. If the center indentation doesn't look obvious on the rolls, poke them again with your finger. Brush with egg wash and bake for 9-12 minutes, until the top gets slightly golden.
- Brush the hot rolls with melted butter immediately. Insert the pecan slices on the center of the rolls to mimic the stem.

We absolutely love these!! This is year 2 of making them for thanksgiving and they are the biggest hit!! My daughter wants them all the time!!
I have an early thanksgiving tomorrow I am wanting to make them today but could I just refrigerate until morning then bake? I’m trying to do the easiest. I have other dishes to make. Any advice helps!
Yes, you can absolutely make them today and refrigerate until tomorrow! Shape the rolls, place them on the baking sheet, cover tightly with plastic wrap, and refrigerate overnight. In the morning, let them come to room temp and finish rising (it might take longer than 60 minutes), poke the center again to refresh the indentation, brush with egg wash, and bake as usual.
These have been a tradition now for probably 8 years, thank you for sharing this recipe everyone always looks forward to them
That means so much, thank you! I love hearing that these rolls have become part of your Thanksgiving tradition. It makes my day.
I’ve made these twice for thanksgiving and everybody loves them! My only problem is that I always end up getting late 😮💨 can I shape the rolls the night before and bake them on the morning of thanksgiving to prevent that?
Absolutely! You can shape the rolls the night before. After shaping, place them on the baking sheet, cover with plastic wrap, and refrigerate overnight.
Hi! If I were to knead this by hand instead of a stand mixer, how long should I knead for?
Thank you!!
Hi Yuki, I would say about 8-10 minutes to knead by hand. Hope you enjoy these pumpkin dinner rolls. Thank you!
I make these every year for Thanksgiving and everyone loves them. Thank you for the tradition!
Thank you so much for adding this pumpkin dinner rolls in your thanksgiving tradition. That’s a great honor for me!
I just made these and had to leave a review because of how cute and wonderful they turned out. They are adorable! Followed the recipe exactly. Thank you! 🙂
I finally made these cute and delicious rolls today while I thought of my dad’s birthday and past Thanksgivings. I used homemade puree. I used 5½ cups of flour. I didn’t look up what Scalding meant, but I assumed it meant very hot, so I put the measurement of milk into the microwave for 2 minutes. Thank you for the recipe!
Glad that they turned out well. Thank you so much for your comment.
Hi, I really like how the dinner rolls look pretty but the only downside is that the recipe calls for 5cups and a little more flour but I had to add quite a bit amount of dough to make it firm, not sure if anyone has faced this issue .
I make these every year for my kids class thanksgiving party for past 4 years. Always a hit! I was wondering if I can make the dough a night before and let it rise in the fridge . And, the next days if I can make the small balls and let it rise in room temperature. I will try it today.
Yes, you can let it rise overnight in the fridge and shape it the next day. I’m so happy to hear that you’re sharing these cute rolls with the kids. What a great tradition you are creating! Thank you so much!
I made this recipe twice–once as written, and second I adjusted heavily. As written, they are yummy rolls, but there is no sweet flavor (I even used pumpkin pie puree). So on the second time, I added a lot more sugar and spices and they were delicious.
My adjustments for sweet pumpkin rolls (for 15 rolls, not the original recipe of 30):
3/4 C milk, 1/4 C maple syrup. Use pumpkin pie puree and add 3 Tsp pumpkin pie spice and 1 Tsp vanilla extract. When they came out of the oven, I brushed the rolls with butter and sprinkled raw sugar and cinnamon on top. I made candied pecans and used those as the stems.
Forgot to mention that even with making a half batch, the rolls were very big so I divided them even smaller on the second time and got about 20 rolls and they were a much more reasonable size to eat.
Hi Holly, We love these. My duaghter and I made them for our potluck Thanksgiving dinner and they were such a hit. Everyone thought they were so cute and original and the kids loved the soft sweet rolls. They are a bit of work but fun, not difficult work and well worth it.