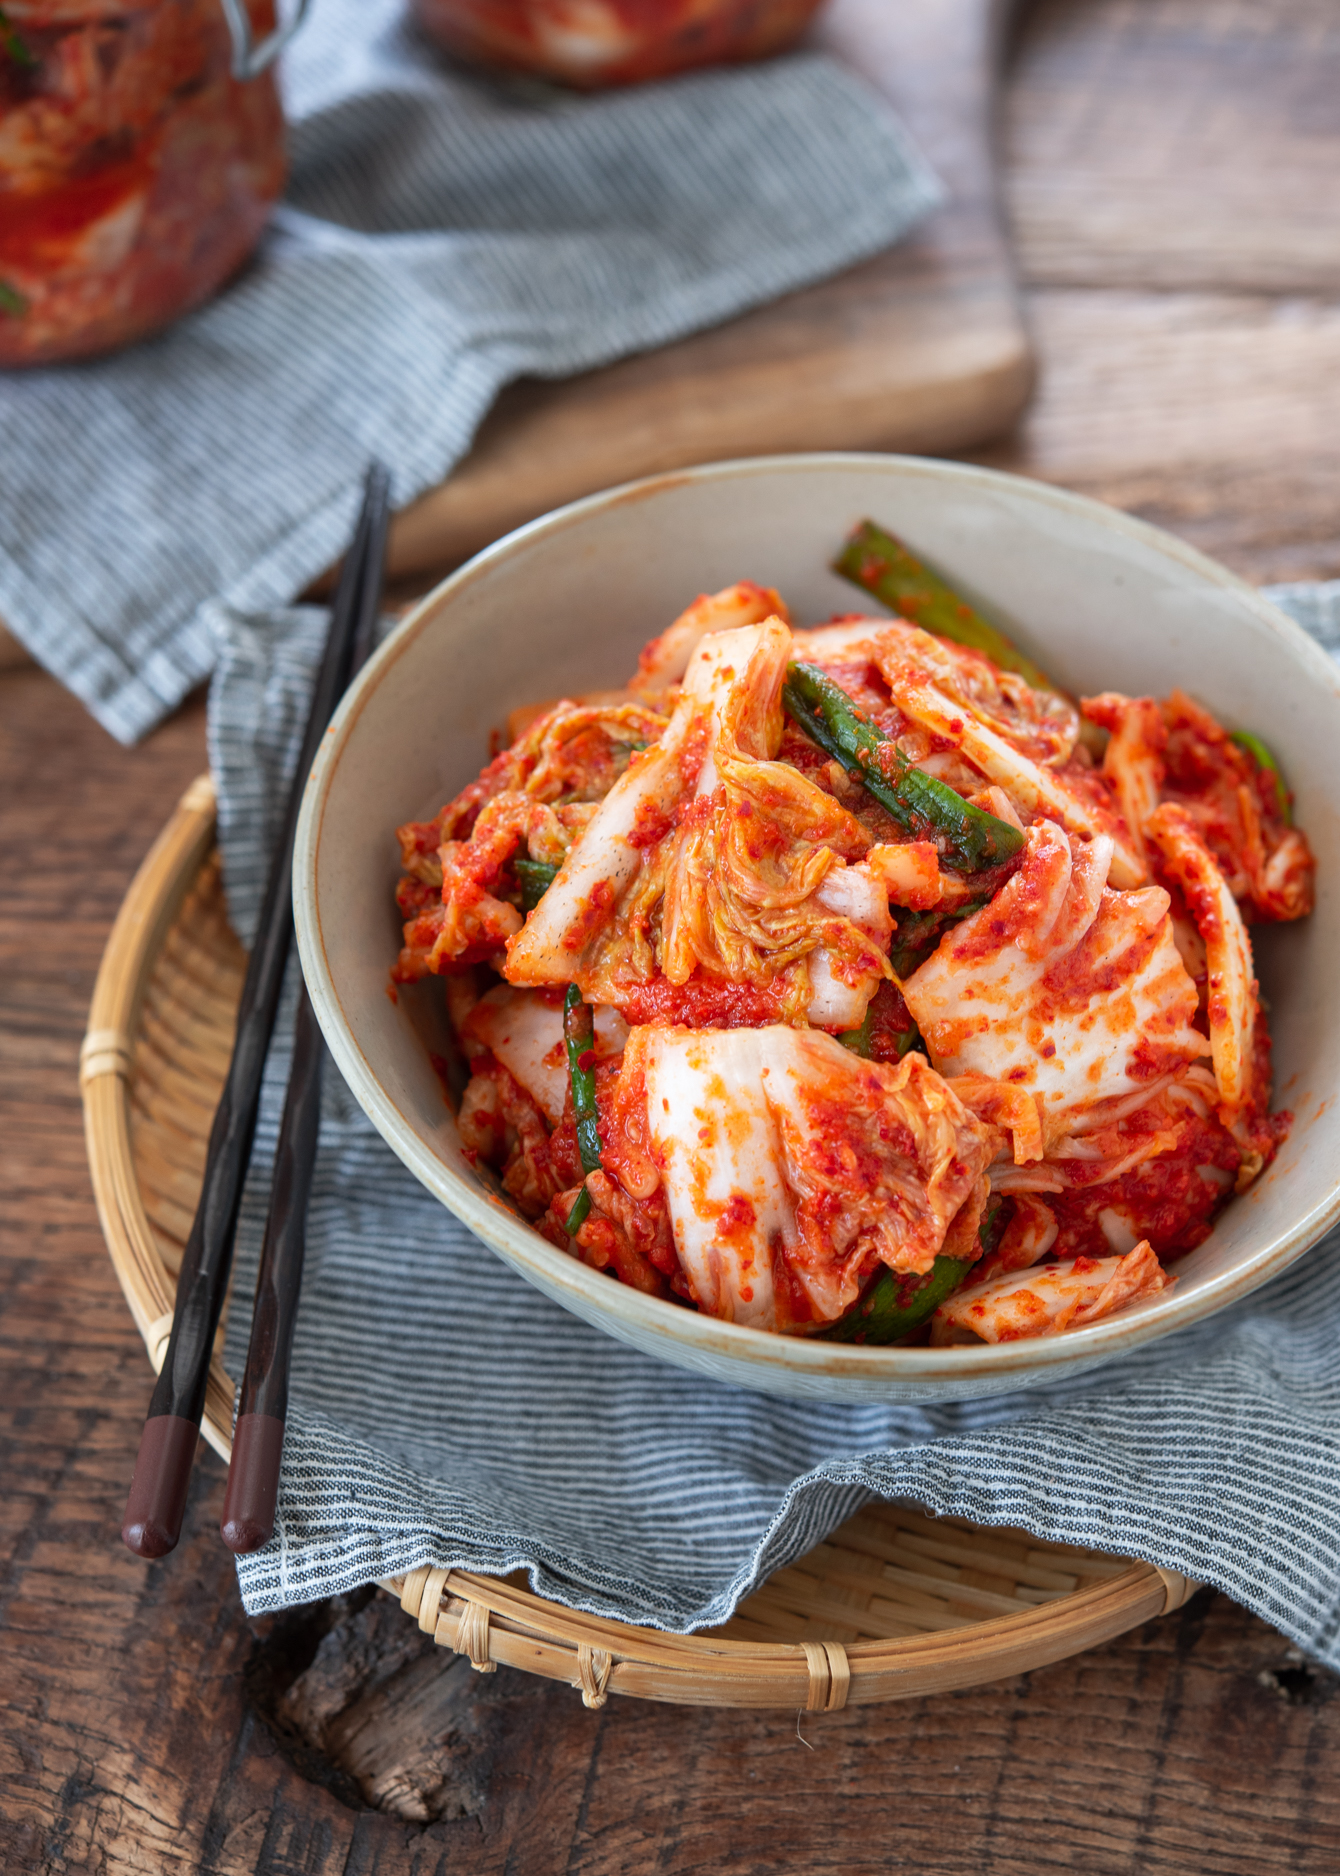
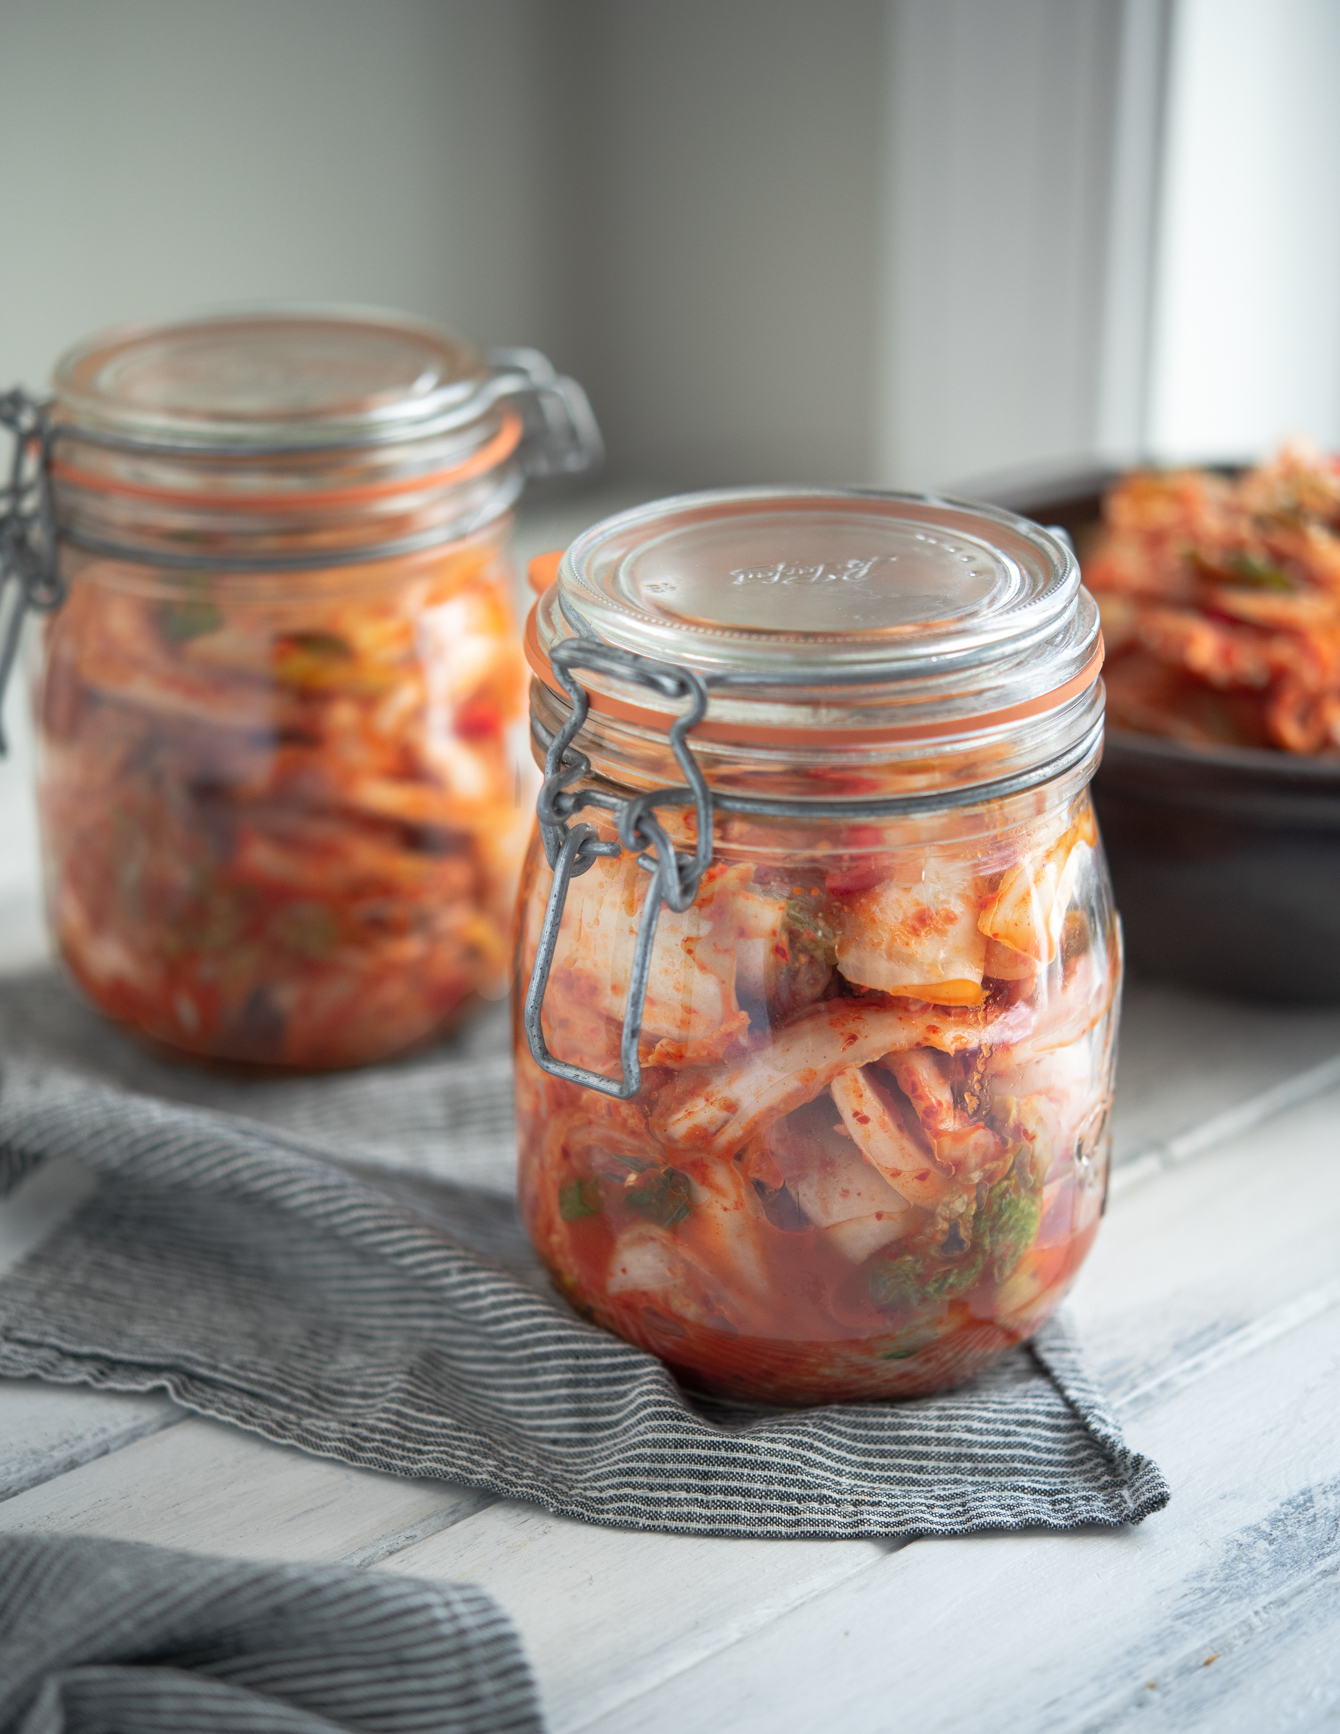
Everyday Napa Cabbage Kimchi
Everyday napa cabbage kimchi made with chopped cabbage, gochugaru, and a simple seasoning paste, then fermented naturally for clean, balanced flavor that works with daily Korean meals.

This is the napa cabbage kimchi I make most often at home — not for kimjang season, and not as a same-day salad, but for everyday meals. It’s a mak kimchi–style recipe, meaning the cabbage is chopped instead of left whole, which keeps the process practical while still allowing the kimchi to ferment properly and develop flavor over time.
I rely on this version when I want a dependable batch of kimchi in the fridge that gets better after a day or two, with balanced heat, tang, and savoriness. It’s the kind of kimchi that works with a simple bowl of rice, soups, or grilled dishes without overpowering the meal. If you’re looking for a home-style cabbage kimchi that’s straightforward, fermented, and made to be eaten daily, this is the recipe I come back to again and again.
Get new recipes via email:
Why This Is My Everyday Napa Cabbage Kimchi
This recipe is designed for regular home cooking, not large-batch kimjang or same-day kimchi. The cabbage is chopped for practicality, seasoned simply, and allowed to ferment so the flavor develops gradually in the fridge. I make this version when I want a reliable napa cabbage kimchi that works with everyday meals and improves over time.
For traditional, whole-cabbage kimchi made in larger batches, see my kimjang kimchi recipe, which follows the classic salting and fermentation process used for winter storage.
Key Ingredients for Cabbage Kimchi
After years of making kimchi both in Korea and abroad, I’ve found that choosing the right ingredients is key—especially for an everyday kimchi that’s meant to ferment and be eaten over time. Here are my go-to ingredients and why they matter.
Napa Cabbage: This is the classic base for kimchi, known for its crunchy texture that softens beautifully as it ferments. Can’t find napa? Green cabbage works in a pinch, though the texture and fermentation will be slightly different. I share a dedicated method in my green cabbage kimchi recipe.
Korean Coarse Sea Salt (cheonilyeom): Korean sea salt draws moisture slowly and evenly, which helps preserve the cabbage’s crunch. I’ve tested regular table salt—it makes the cabbage too limp. Stick with coarse salt made for kimchi when you can.
Korean Chili Flakes (Gochugaru): This gives kimchi its signature color and spicy kick. I recommend using gochugaru made in Korea—it tends to have better flavor and brighter color. Avoid chili flakes that look dull or brownish.
Starch (for the paste): A small amount of starch helps the seasoning paste cling to the cabbage and supports fermentation. When I want a smoother texture or am making a larger batch, I cook a quick sweet rice flour paste. On busy days, blended leftover rice works just as well.
Fish Sauce & Salted Shrimp: Anchovy fish sauce and saeujeot (salted shrimp) provide the depth and umami that give fermented kimchi its complexity. This combination is what I use most often at home. If you avoid seafood, soup soy sauce can be used as a plant-based substitute while still producing a well-balanced kimchi.
Sweetener (Fruit or Sugar): A small amount of sweetness helps balance the spice and acidity as the kimchi ferments. For this batch, I used a blend of apple and pear nectar, which added gentle sweetness without overpowering the chili paste.
Sea Kelp Stock (Optional): This isn’t required, but a light kelp stock adds subtle savory depth to the seasoning paste. Simmer a small piece of dried kelp in water, then let it cool before using.

You don’t need special equipment to make this kimchi, but a few basics make the process easier: a large mixing bowl for salting, a colander for draining, kitchen gloves to protect your hands from gochugaru, and airtight jars with a little headspace for fermentation.
How I Make Everyday Napa Cabbage Kimchi
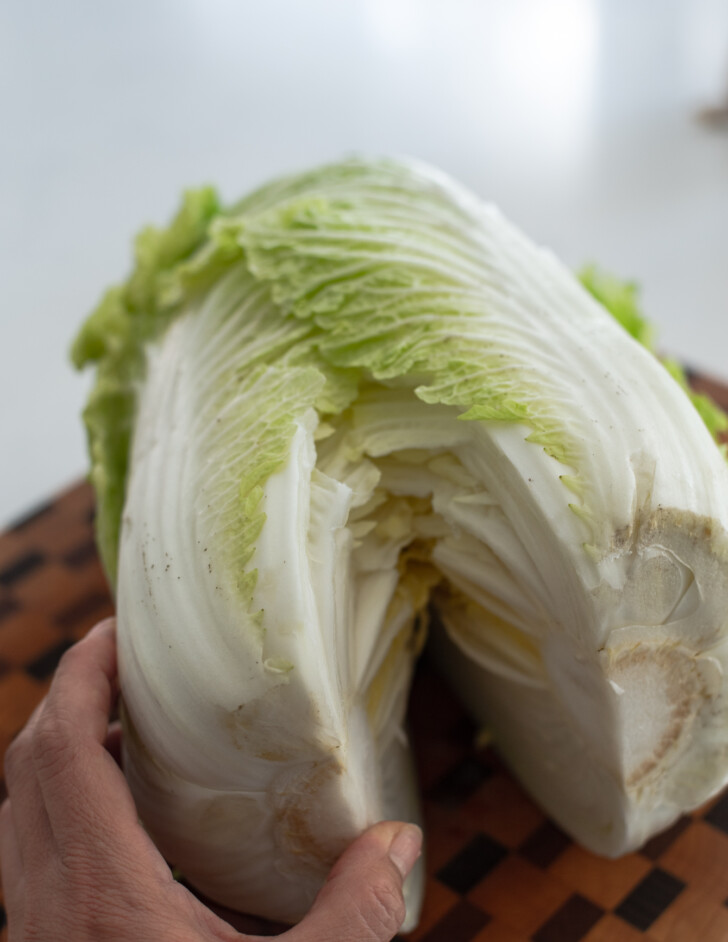
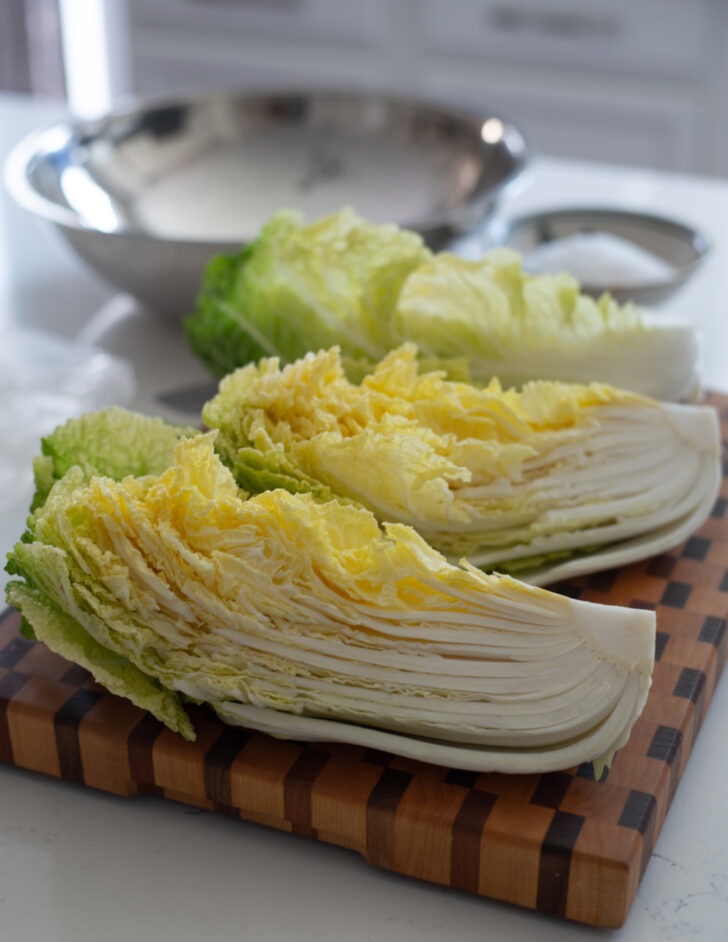
Prep the Cabbage. I start by quartering the napa cabbage the traditional Korean way—cutting a small slit at the base, then splitting it open by hand. This keeps the leaves intact and helps the cabbage ferment evenly later on.

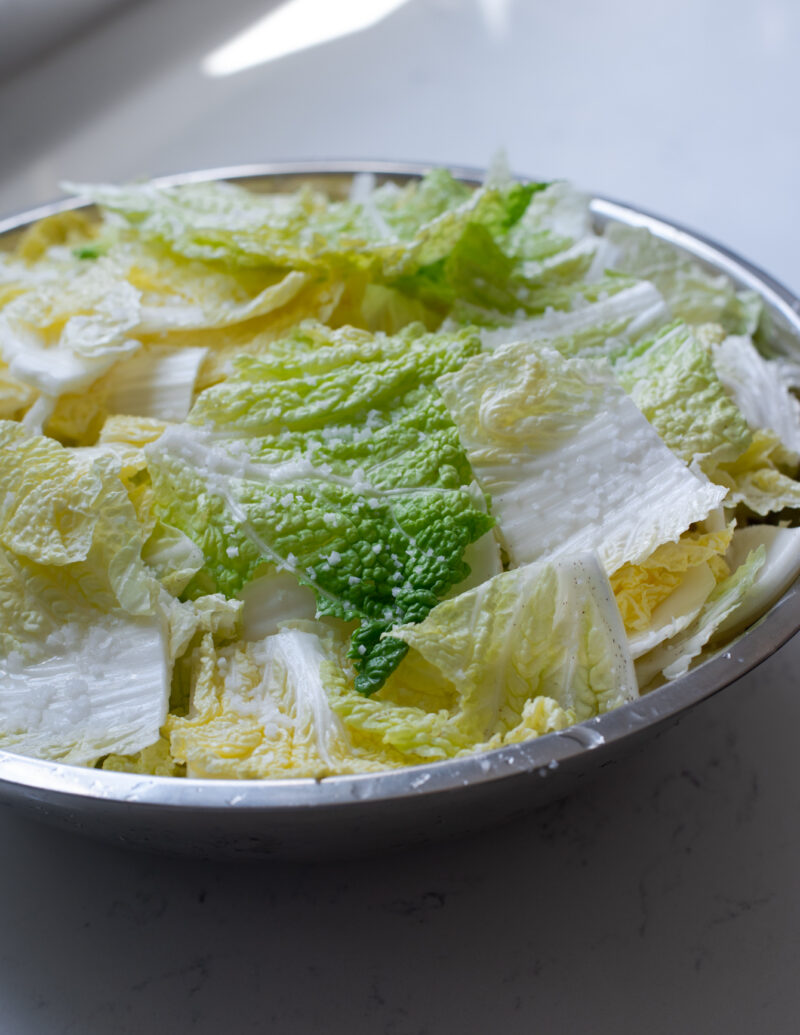
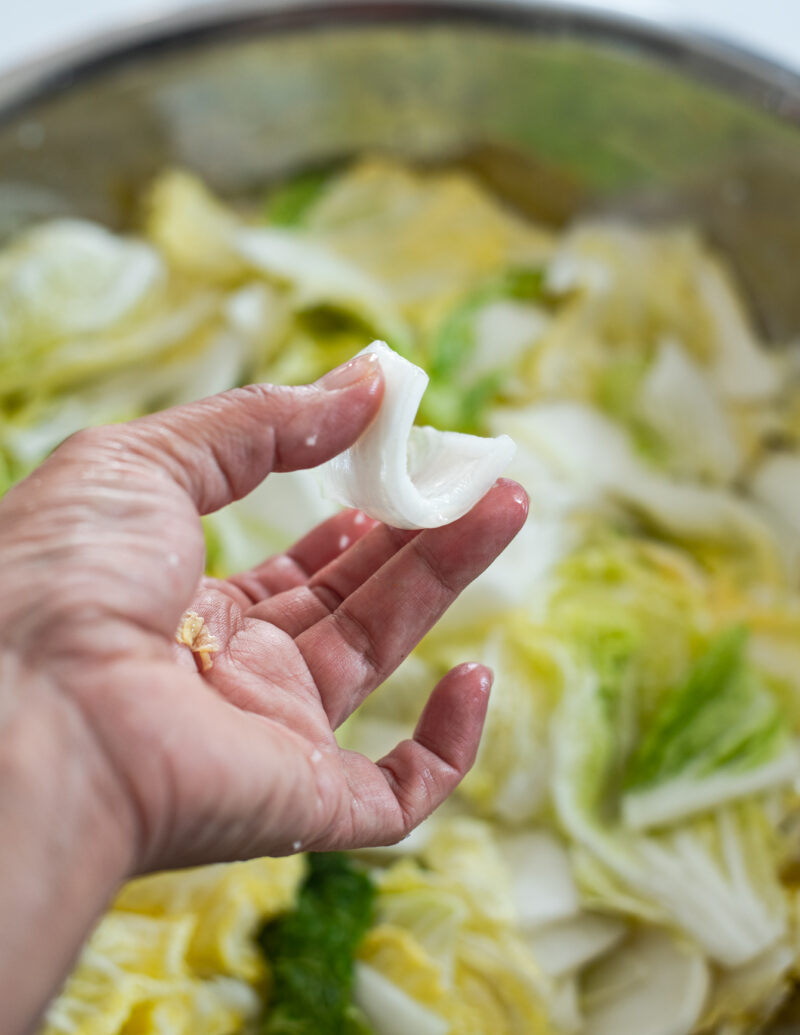
Salt the Cabbage. Cut the quarters into large chunks and layer them with coarse Korean sea salt in a large bowl. Make sure the salt reaches the thicker stem parts. Let the cabbage rest until the stems bend easily without snapping.
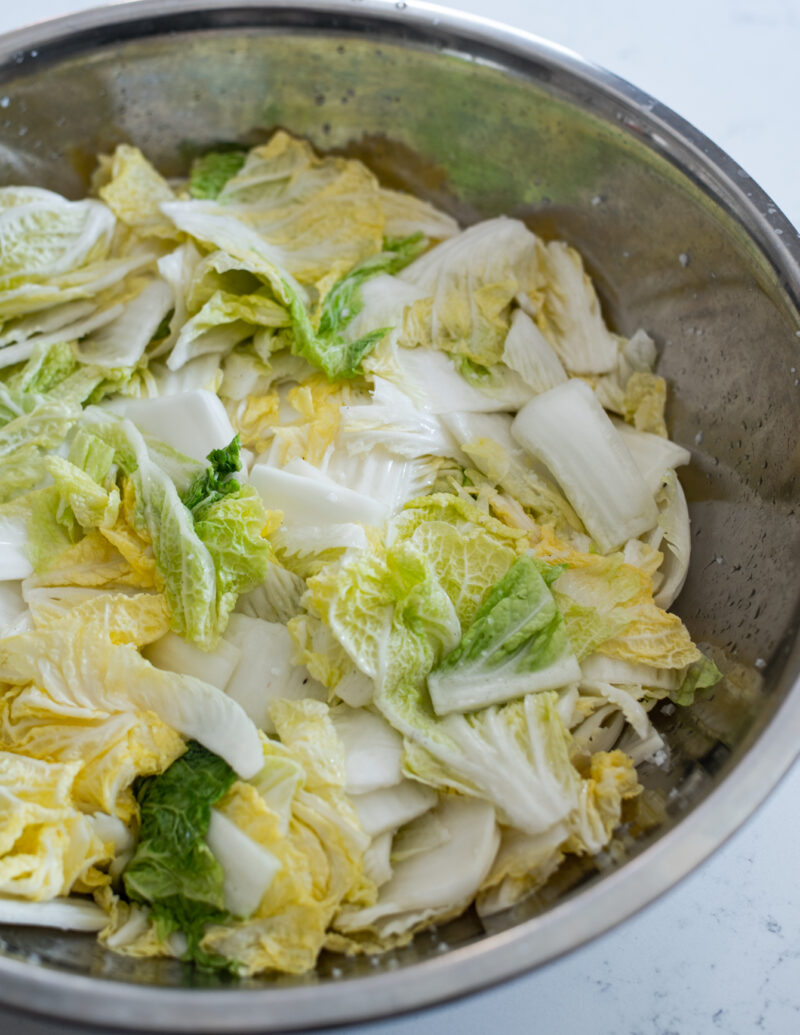
Rinse and Drain. Rinse the salted cabbage a few times to remove excess salt, then gently squeeze out the water. The cabbage should feel pliable but not waterlogged.
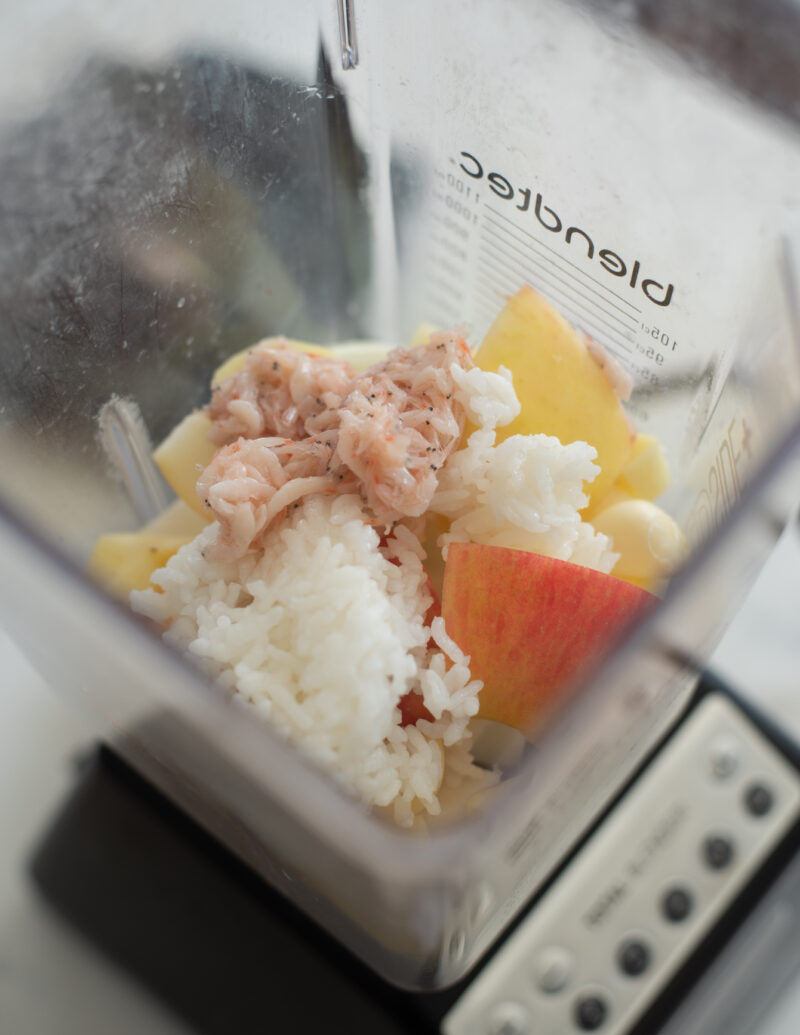
Make the Seasoning Base. While the cabbage rests, blend garlic, ginger, onion, apple or pear, a small amount of sugar, fish sauce, salted shrimp, and a bit of kelp stock if using. This base gives the kimchi depth and helps it ferment cleanly.

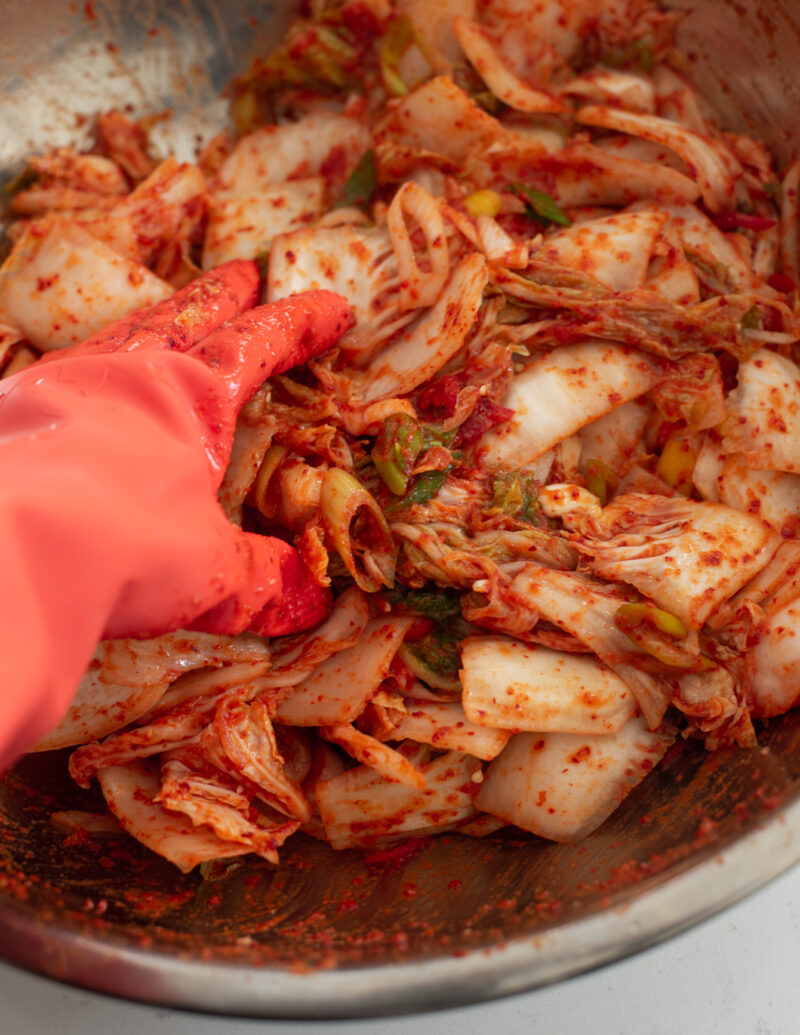
Mix and Season. Stir gochugaru into the blended base and let it sit briefly so the chili flakes bloom. Toss the drained cabbage with the seasoning paste and sliced green onions or leeks, coating the cabbage evenly.
Tip: I always wear gloves for this step—gochugaru stains and can irritate skin. The kimchi may taste slightly salty at first; it will mellow as it ferments.
If you’re looking for a fully plant-based version without fish sauce or salted shrimp, see my vegan kimchi, which follows the same fermentation principles using pantry-friendly substitutes.
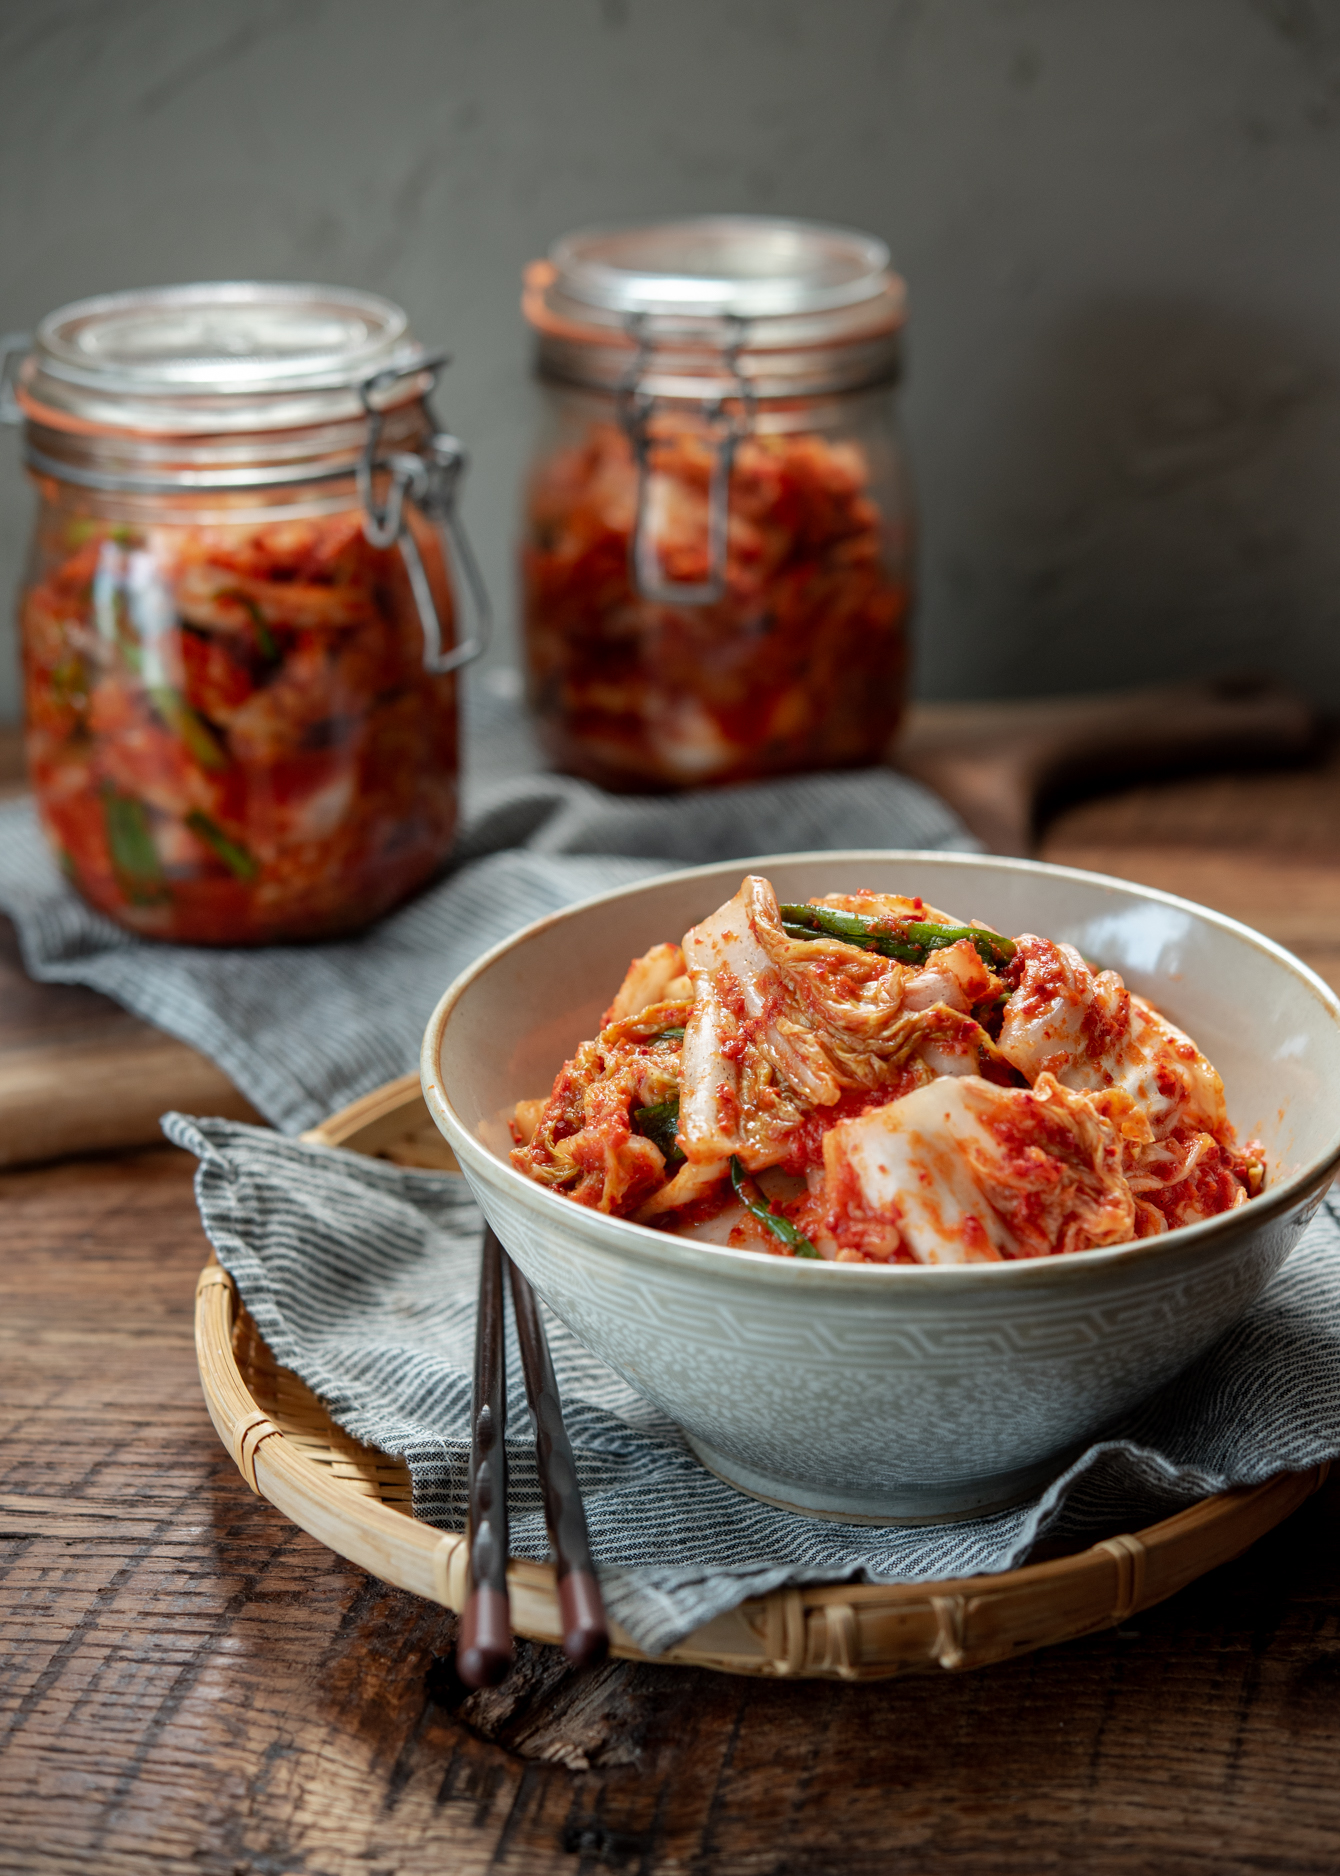
How to Ferment and Store Kimchi at Home
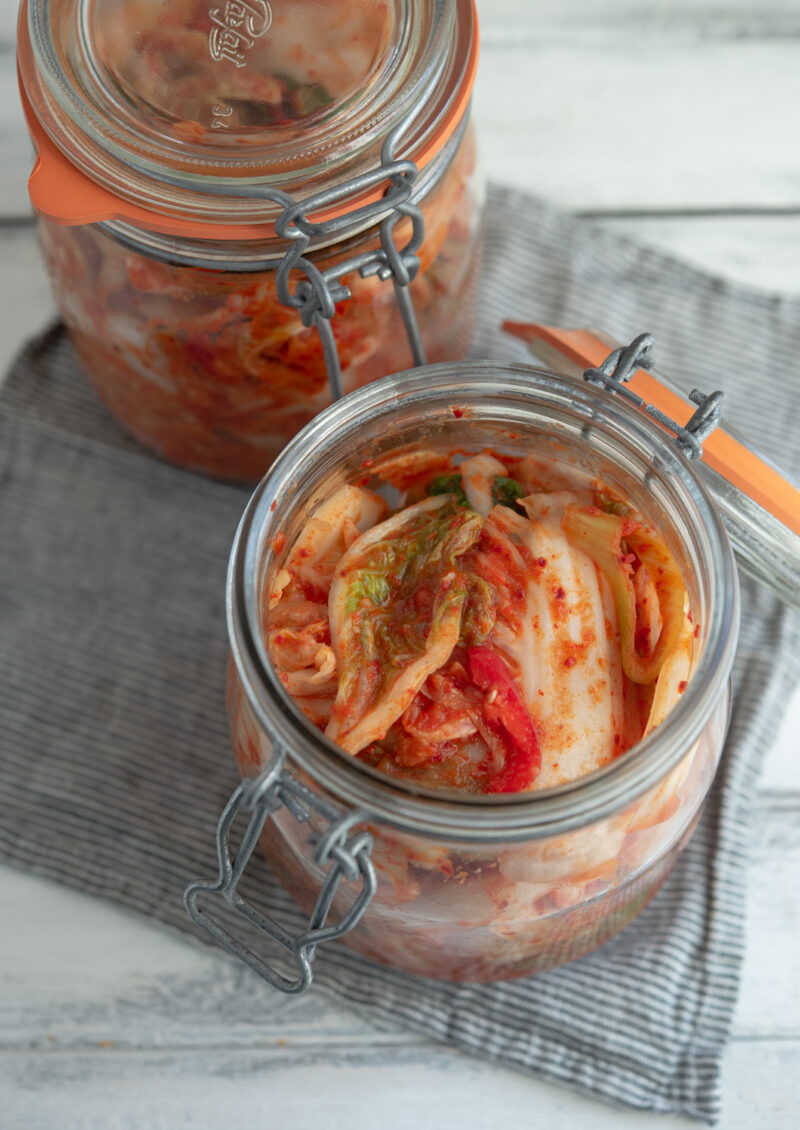
Once packed into jars, fermentation is what transforms the seasoning and cabbage into kimchi. I usually leave mak kimchi at room temperature for about one day—sometimes two if the kitchen is cool—until I see light bubbling and smell a gentle sourness. At that point, it goes into the fridge to slow fermentation.
Because the cabbage is chopped, mak kimchi ferments faster than whole-leaf kimchi. I like it best within the first few weeks, when it’s still crisp and balanced. As it ages, it becomes softer and tangier, which makes it better suited for cooking.
My go-to storage tips:
- Use airtight glass jars and leave headspace for expansion
- Press the kimchi down so it stays submerged in its juices
- Store it toward the back of the fridge where temperature is steady
As the kimchi becomes more sour over time, it’s especially good for cooking. Well-fermented kimchi works beautifully in dishes like kimchi jjigae, where deeper flavor is a plus.
If you want a same-day option without fermentation, make my geotjeori (fresh kimchi salad) and serve it right away.
For other styles and variations, browse my Korean kimchi recipes collection.
Love this recipe? Rate it and share your experience in the comments below! On Instagram? Tag me to showcase your creation. For more delicious recipes, subscribe to our newsletter!
Everyday Napa Cabbage Kimchi
Ingredients
- 3 lb (1.3 kg) napa cabbage, about 1 medium head
- 2/3 cup (200 g) Korean coarse sea salt
- 1 bunch green onion, sliced
- 2-3 fresh red chili (optional), sliced
For kimchi paste
- 1/2 large onion, diced
- 7-8 cloves garlic
- 1 inch (2.5 cm) ginger, peeled and diced
- 1/2 large sweet apple, seeded and diced
- 2/3 cup (60 g) Korean chili flakes (gochugaru)
- 1 tbsp (12 g) sugar
- 4 tbsp (60 ml) Korean anchovy sauce
- 1 tbsp (15 ml) Korean salted shrimp
- 3 tbsp (45 g) cooked white rice
- 1/2 cup (120 ml) sea kelp stock , or water (See note)
Equipment
- glass food storage jars 1 gallon (3.5 liter) airtight container
Instructions
To salt brine the cabbage
- Cut a 3-inch slit through the white stem part of cabbage. Open up the cabbage from the white stem part using your hand. It should open up easily. Cut additional slits on each cabbage half on the stem and open up again. By doing so, you are quartering the cabbage the Korean traditional way. Rinse the cabbage quarters once to wet them.
- Dice cabbage quarters into large chunks. For the large outer leaves, slice them in half lengthwise first, then dice into chunks.
- In a large bowl, put in a small layer of cabbage chunks and sprinkle about 2-3 tablespoons of coarse sea salt over the cabbage. Repeat the process several times, creating layers of cabbage chunks and salt.
- Let the cabbage soak for 1-2 hours, turning them upside down a couple of times during the soaking. When you bend the white stem part of cabbage, if it bends with a gentle pressure, the brine step is completed. Rinse the cabbage 3 times in water. Drain the cabbage in a colander, pressing down gently to remove excess water.
To make kimchi paste
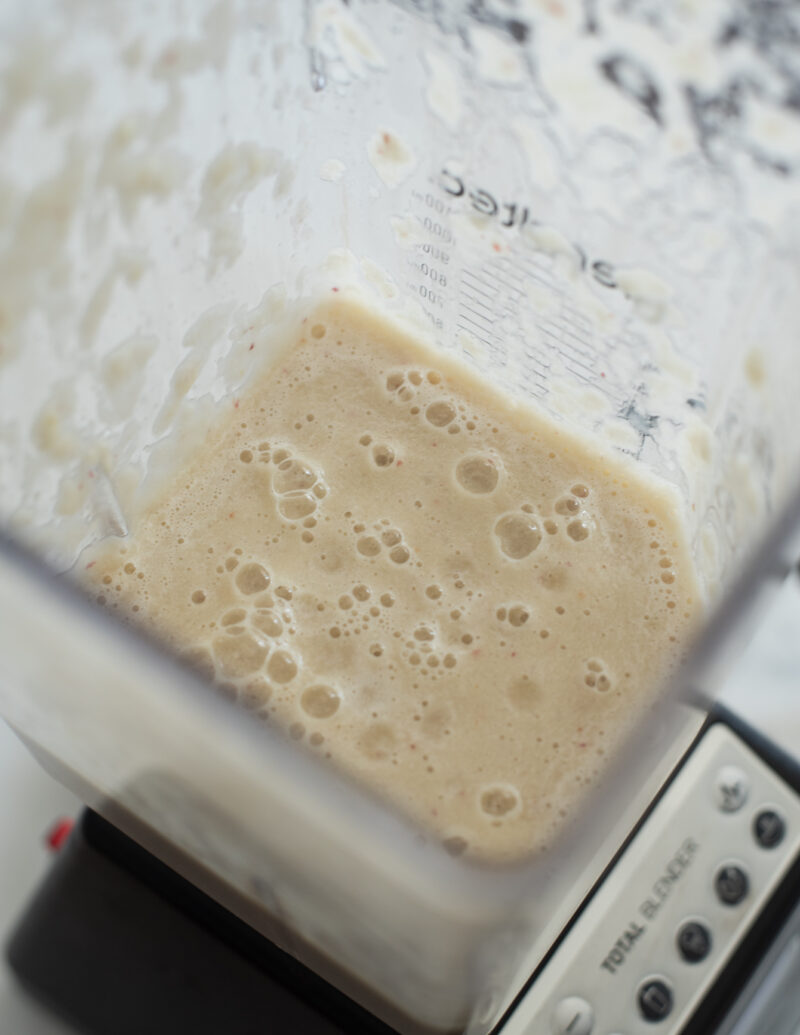
- Combine onion, garlic, ginger, salted shrimps, fish sauce, cooked rice (or other choice of starch), and fruit in a blender. Pour in sea kelp stock (or water) to allow the blade to mix the ingredients. (If using fruit nectar, you don't need to add stock.) Process everything until smooth.
- Pour the puree in a large mixing bowl. Add Korean chili flakes, and mix well. Taste and adjust the seasoning of paste for your liking. Let the paste rest for 5 minutes, so the chili flakes will get re-hydrated.
To assemble kimchi
- Put the drained cabbage in a large mixing bowl. Add leek (or green onion), fresh chili (if using), and kimchi paste to the cabbage.
- Mix well to coat the cabbage with the seasoning paste. (Wear kitchen rubber gloves to protect your hands from getting stained or smelly.) Taste your kimchi! If your kimchi tastes saltier than you would hope for, don't worry! Freshly made kimchi usually taste much saltier, but the saltiness will subdue as it ferments.
To ferment and store kimchi
- Pack kimchi tightly into a clean glass jar, leaving 1 inch of headspace. Seal with a lid and let sit at room temperature (60–75°F / 15–24°C) for 1–2 days until light bubbling appears. Transfer to refrigerator and let ferment 4–5 days before serving. Best within 1–2 months.

heard about this on ndombolo radio, decided to give it a try.
I am looking forward to making your kimchi recipe as soon as I can get all the ingredients. Instead of the rice, can I use a cooked yellow skin potato (the kind you boil)? If yes, how much do you suggest I use? Thanks!
Yes, you can use a cooked yellow potato (skined) instead of rice. Just boil the potato until fully tender and use the same amount as the rice listed in the recipe. Hope your kimchi turns out great!
Hi Holly! Thank you for sharing your kimchi recipe. It is my favorite! I make it every few months. I especially love the specific brand of gochugaru you linked in the recipe; however, Amazon has stopped selling it 🙁 I’m sad because I really liked it. Do you have any other recommendations for specific brands of gochugaru that are 100% made in Korea? I’ve tried looking on Amazon, but it is hard to find.
Give this brand a try this time (https://amzn.to/4jBGDKk). I hope it gives you the same great results as before! I’m so happy to hear you’re enjoying my kimchi recipe. Thank you! 😊
I have an autoimmune disease (Sjogren’s) and cannot eat hot spicy food. I should eat Kimchi every day. I have bought Kimchi
at the grocery store but it is too spicy hot for me to eat— it breaks me out. Do you have a suggestion for me to make a fermented but mild Kimchi?
Try white kimchi, which doesn’t include any chili flakes. I don’t have the recipe for it yet, but I’m planning to post it soon.
I am Korean and live in a country where I cannot buy kimchi. My mother has tried a ton of kimchi recipes and sent me this one to try because it is her favorite. I completely get why it is! This recipe is amazing! Very authentic and so so yummy.
This is my favourite kimchi recipe, I have tried others but they don’t taste as good!!
So happy to hear that. Thank you very much!
A fantastic recipe and directions. really made a beginner feel capable. Thank you
Can you use something like dashi as an alternative to the sea kelp stock?
Thanks!
I don’t recommend dashi for making kimchi. Dashi uses smoked fish such as Katsuobushi and it can leave the smoky flavor to the kimchi.
I have never made kimchi before and am planning a batch in the next few days as Xmas gifts for family. Your website is so informative (explaining the why of the steps and not just the how, which I absolutely need) and makes it look so easy, I am looking forward to getting started!
Hi!
Planning to make the Kimchi recipe soon. The recipe says “12 servings”, but how much is that in weight/volume? I’d like to make enough to fill six 16oz jars to give to friends. Would this recipe make enough to do that? Thanks!
This recipe uses one medium-sized cabbage and yields approximately 6 cups (1.5 liters, 50 oz). The total volume will fill three 16 oz jars. To fill six jars, you’ll need to double the recipe. Hope this helps
I have a question that will probably make people cringe. I like the flavor of kimchi, but I can’t stand the texture. The specific crunch of raw cabbage and onion is something I can’t tolerate. I don’t want to cook kimchi and destroy the probiotic benefits, so is it possible to cook the cabbage and onion before starting this recipe? Maybe steaming them until just softened then salting the cabbage? I appreciate the help.
I recommend you to also explore my quick kimchi recipe at https://www.beyondkimchee.com/30-minute-kimchi/.
In that recipe, you can slightly blanch the cabbage before adding the seasoning paste. While it may not provide the exact texture you desire, it’s worth trying for a different approach.
Hello!
I am a first-timer… I was using green cabbage instead of Napa because I was told that I could substitute it, but it wasn’t wilting as it should. So I left it in longer, and it finally started to wilt after it stayed in the brine overnight, but no matter how many times I rinse it, the cabbage tastes pretty salty. Is this normal? Or should I toss it and try again? Should I try blanching the cabbage first? Thanks for any help you have for me!
Sincerely,
-D
Hi David
What type of salt and how much did you use? Even if you let the green cabbage sit a little longer, it shouldn’t be too salty if you uses coarse sea salt (people often mistakenly uses table salt, and that can case the extreme saltiness. If using table salt, you have to use 1/3 of amount).
Also the green cabbage doesn’t have to be completely wilted during the salting process, just a little lifeless stage works fine.
Often the saltiness subsides as kimchi ferments, so let your kimchi ferments a few more days and see how it tastes. If you have some chunks of raw radish, stick a few pieces with your kimchi. They will absorb the saltiness and even out the taste.
I’m concerned my mixture is mushy. I used Korean gochujang paste rather than dried chilli flakes. I also added too much apple and rice. Should this be okay or should I tip it out and start again?
Hi Jeanette
Unfortunately, using gochujang paste to make kimchi is not recommended. As you mentioned, it can result in a mushy and overly pasty texture. I highly recommend using Korean chili flakes (gochugaru) instead, if possible, and giving it another try.
Still in the process of making this (got a case of free napa cabbage so I also made a bunch of sauerkraut), so I can speak to the final result but the smell and taste of the chili paste is making me so happy. Totally happy letting the smell fill my house while the cabbage salts! The only changes I made were red chili flakes instead of Korean because the store didn’t have them, and fish sauce instead of anchovy paste because it was what I had on hand. I just happened to have the salted shrimp of all things I got from a specialty store leftover from another recipe. 😂 Going to try it with the anchovy paste next time to see if there is a noticeable difference.
Hi Selia
I’m glad you’re trying this kimchi recipe, but I’m a bit concerned about using chili flakes instead of Korean gochugaru. Regular chili flakes can make it very spicy. I hope it’s not too hot for you. Adding salted shrimp to kimchi is great, and I suggest mixing it with fish sauce next time. Fish sauce is a substitute for Korean anchovy sauce, but use a little less. Hope this helps. Thanks for the comment!
My kimchi is kind of dry, like there isn’t enough brine, what can I do to make it juicier?
When you are finished assembling kimchi and put it in a container, try adding more water (or kimchi stock) to the mixing bowl you assembled kimchi in. Swirl the water around the bowl to collect all the kimchi paste residue and pour it back to the kimchi container. The more water you add, the more kimchi brine you will get. Some people don’t want too much brine, so it’s a personal preference. Hope this helps. Thanks!
Hi i was wondering can i use fish sauce instead of anchovy sauce? And i dont like shrimp so id have to buy it just gor this recipe. Is it 100% necessary or can i substitite it for something else? This will be my 2nd attemptbat kimchi hopefully it will work the last attempt went mouldy.
Hi Becky
You can use fish sauce instead of anchovy sauce. Also, you can skip the salted shrimps and that’s perfectly fine. And you don’t need to increase the amount of fish sauce to make up for the missing salted shrimps since fish sauce is usually saltier than Korean anchovy sauce. Hope this helps.
This was the most informative and easy to understand start to finish Kimchi recipe I have found and I really appreciated the fermenting tips as that was what I think was my missing piece of the puzzle. I will report back on my results.
Hi Michael
I am glad this post is helpful to you. I hope your kimchi making will be successful so that you can enjoy the outcome. Thanks for the comment.
What about using jarred dried sardines packed in oil in place of the shrimp/fish sauce?
Hi Leslie
I wouldn’t recommend the jarrd fish in oil. Fish sauce itself is fermented and has component to bring good bacterias to the kimchi.
If you can’t find fish or shrimp sauce, you can omit it. It will still ferment, but with more subtle in taste.
My ex MIL used to make Kim-Chee when she was alive. Always too spicy for me. Can you use any veggies you want or does it need to be the ones you’ve mentioned. I was thinking maybe, bell pepper, onion, cabbage and something else. No anchovy flavors. Thanks for the recipes
Hi Karen
You can use either napa or regular green cabbage with this recipe. Bell pepper, carrot, and radish are good vegetable to add. If you are not fond of anchovy sauce, there’s another fish sauce called “Kkanari (까나리)”. It has a milder taste than anchovy. If you prefer not to use any fish sauce at all, then try my vegan kimchi recipe for the idea.
You can always adjust the amount of chili flakes for your preference. You can use less than what the recipe asks for, then you’ll get a milder kimchi, but pale in color. Also, some chili flakes are spicier than the other. I recommend avoiding the extra spicy chili flakes, so check the label.
What a fantastic tutorial. It’s inspired me to try making kimchi at home. I’ve always enjoyed it but thought it took weeks or months to make so it never occurred to me to attempt it. But this sounds completely do-able!
My 4 year old daughter and I just made this recipe to a tee except I forgot the leeks and green onions. She went from being a food wimp to being a daring taster in the course of a day. Ended up with extra sauce. What’s the funnest or strangest thing to do with it?
Thank you so much Holly for a delicious and easy kimchi recipe!! Your great sense of humor and eloquent writing style is highly appreciated as well. ^_^
Dear Holly.
I am a fulltime housewife and a fan of korean cuisine. As korean cuisine especially this side dish became more popular at my country I wish to use your recipe to produce homemade kimchi for selling purpose. I hope you dont mind. Thank you very much.
Thanks for letting me know. If you are selling for a small volume amount, just a few bottles at a time, it won’t bother me that much. However, if this is more of mass produce business, that would be a different story. Please let me know what your plan is.
Thanks for your feedback Holly. That’s the reason why I reach you in the first place. To seek for you permission. As far as your concern couple of bottles would do. And Im not getting any ideas to make it big. With 3 kiddos that I have sure timing would be an issues. But if you have doubted in me please let me know. I believe honest will lead you to success. Thanks and really appreciate your feedback.
Fyi, I’ve been making kimchi using your recipe couple of times. My husband was once study at Korea for 8 years. While he yearns for kimchi it was your recipe I digged out. And the idea to turn it to bussiness just popped up recently. Once again thank you Holly!
Hello Holly,
I’ve been wanting to make kimchee for quite some time and when I found your website, I knew I found the perfect recipe to try it for the first time. So over the last weeks I’ve been collecting all ingredients and today was the big kimchee-making day! I’ve made the paste (which tastes really good already!) and I soaked the cabbage in the sink. But sadly, something seems to have gone very wrong. I have rinsed the cabbage about five times, almost piece by piece and I also let it soak in regular water, but it still tastes TERRIBLY SALTY. I’ve used coarse sea salt (since I could not find Korean salt here in the Netherlands) 1 + 1/2 cup of it and about 2,5 liters (10 cups) of water (a little bit more than you stated, since I had a lot of cabbage). I also tried to dissolve the salt in the water, maybe that is what I did wrong? There were almost no salt kernels left, because it was all dissolved in the water.
For now, I put the filling in the fridge to keep it well, and the cabbage is still soaking in it’s bath of regular water, because I’m still hoping it will lose some of its saltiness. It would be really sad to have to throw it away…
So dear Holly, even if this post is already a few years old, I’m hoping you want to help me and my sad, salty cabbage! Do you think there is a way to save it (the saltiness is extreme though, I cannot taste cabbage, only salt)? Or can you tell me what I might have done wrong? I still have a great kimchee filling waiting in the fridge, so I’ll definitely try again using new cabbages and, of course, a different baptizing technique.
Thank you so much in advance!
Emma
Emma
First of all, I admire your willingness trying making kimchi from scratch. It is difficult job to a beginner but it doesn’t mean that you can’t succeed. Your kimchi would be fine.
To help you with salting the cabbage in a salt brine, the ratio of water:salt as 10:1 or 10:1.5 isn’t too bad. Unless you soaked the cabbage way too long, it should be fine. The cabbage will taste very salty even without the seasoning at first. The saltiness will ease as time goes. So wait until it gets fermented for a few days. Taste it to see if it is way to salty for you. If it is still very salty to eat, then put a few slices of radish (or turnip) in between the cabbage. That will help.
DOn’t soak the cabbage in the regular water too long. Otherwise it will come alive again. LOL!
Hope this helps. Please let me know how it goes.
Hey Holly,
Thank you so much for the reply! It’s great having a Korean person helping me out with making kimchi 😉
I wanted to let you know how it went. Well… The kimchi turned out amazing! In fact, me and my boyfriend have emptied the pot already and we’ll have to make a new batch next week. I cooked several meals with it, but most of it was eaten straight out of the pot. It was truly amazing!
After a while soaking in regular water, the cabbage had become less salty so I rubbed in the filling and put everything in a big pot. On the fourth day of fermenting, we ate our way through the first quarter of that haha, straight from the pot!
For the next batch, I’ll try soaking the cabbage in less salty water (1:10 ratio) and I’ll reduce the soaking time a bit (I’m not sure, but I might have soaked the cabbage longer than you recommended). Also, when we started eating the kimchi, it was very spicy for us (here in the Netherlands, when something says ‘spicy’, it’s probably not very spicy), but now that the pot is empty we seem to have gotten quite used to it already. I may reduce the amount of chili flakes a little, but I definitely won’t split it in half like I thought I would 10 days ago haha!
Thanks so much again for this recipe and for the help. We’ll be making and eating a lot of kimchi in the future 🙂
Oh! I had another question! The salted fermented shrimp that you use? Is there any other way I can use it? Any other Korean dishes or improvisations? Thank you!
Salted Shrimps can be used in many dishes that need a little bit of pungent flavor. You can use for pretty much any Kimchi recipes, or in clear soups to season. You can also use a little amount to make Korean style rolled egg side dish or steamed egg pudding (https://www.beyondkimchee.com/steamed-egg-pudding/).
Hope this helps.
thank you again!
I just made this kimchi and it is AMAZING! I wanted to find a simple kimchi recipe that didn’t include radishes (since I didnt buy any! OPPS). I also didnt have the shrimp paste or the anchovy sauce that you speak of.. I used Vietnamese fish sauce instead, which I’ve seen my Korean friend’s mom using in her kimchi and it turned out fine! I really love the instructions you gave and appreciate the time it took you to post this recipe up for people like me who are addicted to Korean food! Also! My friend’s mom made her’s with cheap beer. Do you know why that is? If i wanted to make it like that, when would I add the beer and how much of it? Would it be in place of the fish broth? I thought her kimchi was the BEST kimchi I’ve ever tasted. I also only soaked one head of Chinese lettuce in a 1/4 cup of salt and it was fine. I’m sure it’ll taste even more amazing once I get the shrimp paste! Thank you so much and I love the kimchi!
Hi Thu
I never heard of adding beer in Kimchi. Beer is often used to cook with pork belly or make stock with. Maybe she used to make a stock to add in kimchi filling?
Anyhow, glad to hear that the kimchi turned out great. Thanks for your kind comment on my recipe. Hope you can continue your journey in Korean cooking.
Loved your recipe. I am sharing it with my readers with a link to this blog. Thanks.
i dont like kimchee too spicy how much chili flakes do i add then
A little as you wish. About 3-4 tablespoons?
Hi Holly. I had never made Kimchee before but I wanted to surprise my new Korean girlfriend. After many hours of research on the internet, I decided to try this recipe. It was a combination of the many good and success comments, the use of rice rather than sweet rice flour and your easy to understand and follow instructions with pictures. Since we eat a lot of Sushi and Sashimi at home, I always have Sushi Rice left over. I followed your recipe and fermented it in the Kimchi Fermentation box sold on Amazon. After the first day, I tasted it each day up to day 3. At day 3 it was perfect for me. I put it in a Mason Jar and into the refrigerator. Last weekend I gave it to her along woth our afternoon sushi. She was amazed. She said.. Wow, where did you get this? I had to show her my Fermentation box and the Korean Red Pepper flakes to convince her. Needless to say, we are not buying Kimchee in the store anymore. The only things I added were about a one pound of Julienned Korean Radish and four Julienned Carrots otherwise I followed the recipe exactly. Thank you so much for this and all your hard work.
Thanks Joe! I think you just mastered how to make simple kimchi! Congratulations! I bet your girlfriend is so impressed.
Holly, I’ve followed your recipe but I have a problem. All the pictures of the kim chee are a beautiful
red mine is med brown what happened???? Could it be the red pepper flakes was not fresh? I’ve made several times before and still brown not red. Unappetizing looking.
Hi Charlotte
The red color of kimchi depends on the chili flakes you use. Korean produced chili shouldn’t be brownish. Some Chinese or Mexican origin chili flakes can be quite brownish in my experience. It really depends on the quality, I think. How do you store your chili flakes? I recommend to store in the freezer to keep them fresh. If your store in the cupboard, when the weather gets humid it will get moldy easily.
Holly, thank you for the prompt reply, I think I’ll have to dump the whole gallon its really ugly. In
Hawaii maybe its to warm and humid, I’ll have to just try again. This time I’ll refrig. the package of
Korean peppers. Aloha, Charlotte
Un postе rempli de vérités
Great recipe!. The best part I liked is, you can store it and use for next day. The fermented taste also seems good. Usually cabbages with holes are not recommended, but your point seems to be thought provoking. Thanks!
I must try this. =) I was wondering…how long can this kimchee last stored in the fridge?
Thanks!
Great information. Lucky me I came across your blog
by accident (stumbleupon). I’ve saved it for later!
Even though my children are born and raised in the US, they love kimchi and refuse to eat any Korean soup/stew if there is no kimchi as “ban-chan.” After many failed attempts at making them myself, I recently came across your website and finally made my first successful batch with your easy kimchi recipe. As you probably understand, the greatest measure of success is the approval from your children. I was glad to receive a “two thumbs up, Mommy” comment from them.
I admire your talent and dedication. I feel so inspired to cook many of your dishes. Thank you for sharing.
Hi bmint
Great to hear that your kimchi turned out with a success. Kimchi is so essential to Korean cuisine and I think your kids got the authentic Korean tastebud. Thank you so much for your kind word. It is a quite of work to keep up the recipe blog. I do sometimes get overwhelmed by the amount of hours I need to put in to maintain, but readers like you inspire me to keep on going. I appreciate for your support. Thank you!
Dear Holly:
I have bought some salted octpus from the local korean store. The sales lady told me that it can last for months in my refrigerator. It is saltier than I expected, so it naturally sit in my fridge for a long time now. How long do this side dish last?
Hi, Holly! I’m a subscriber to your blog and I enjoy reading it very much. I love your sense of humor! I also love most of the recipes you posts. Thanks for having your blog and recipes!
Hi Holly,
I made this easy cabbage kimchee. It turned out quite well. I have a few questions for you.
If I want to use salted anchovies in place of the salted shrimps, are your anchovies very different than the Italian variety in coarse salt, if you know what I mean? Because I always have those in my fridge and are more convenient for me. Also, if I want to make a paste with glutinous flour rather than using leftover rice, should I use same quantity?
Aso, if after some time you think your kimchee doesn’t have enough liquid, can you add water with added salt? 4-5% salt is correct?
I let ferment my kimchee at room temperature for one day and half. I don’t think I’ve notice any fermentation in that time, possible?
But now after 5 days in the fridge has a very pleasant taste, although not very fizzy.
Hi Francesca
This recipe uses two different sauce; anchovy sauce and salted shrimps. If you are using the anchovy sauce but not having the salted shrimps to go with, you can omit the salted shrimps in the recipe. However, if you want to use the Italian salted anchovies alone, it can be tricky but might work. Is your anchovies are covered in oil? I would use about 1 anchovy fillet per small head of cabbage. Remove as much as oil possible first then puree with the onion mixture. Then use as directed.
For the rice glue, you can definitely use that instead of the leftover rice. I would suggest to use about 1/2 cup for this recipe.
For the kimchi juice, do not add the salted water after it is fermented. It will change and thin out the flavor of kimchi. If you like to have lots of kimchi juice, after you toss your cabbage with kimchi filling, transfer the kimchi into a container first. Your mixing bowl should have a little kimchi filling remaining. Pour a little more water (and add 2 tablespoon more of kimchi filling if there is any leftover) to rinse out all the residue of the filling and pour back over to kimchi in the container. Your cabbage will continue to let the moisture out as it gets fermented, so don’t add too much water.
Hope this helps. Let me know if you need further assistance. Good luck and have fun making the kimchi!
Hi Holly,
your answers are very very helpful. The good italian salted anchovies are very different than the one commercially available in the US. Also we have different styles: under oil, under salted brine, or under coarse salt.
And thanks also for the liquid suggestion. Now my kimchee has been in the fridge for 3-4 days and has not released a lot more liquid. But my (chinese) husband is a big fan. He wants me to make a huge container and add a fresh habanero.
I still have some of the paste and I’m thinking of using for the huge amount of broccoli stems I have in the fridge that my children refuse to eat.
I love how people from different parts of the world can finally try to grasp another cuisine, thanks to blogs and the internet!
Ciao,
Francesca
Is there any way to make a small batch of kimchi? I’m the only one in my family that eats it, and whenever I get store bought the flavor is just off.
You can half the recipe. But for the salt brine, use a little more than 1/2 recipe amount.
Holly: I just wanted to say thank you for posting such a detailed tutorial for mak kimchi! The kimchi turned out just beautifully. We will have it on Christmas with the momofuku recipe for bo ssam.
I love your blog — such a great resource. Happy holidays!
Kim
hi.. im a filipina, and i want to make kimchi.. ahmm.. can i use, chili powder instead of chili flakes? .. i already have chili powder
You can use chili powder. Use a little less than the given amount.
ok.. thank you ^_^
Hi Holly,
I made your spicy pork last night and it was fantastic! I want to try this recipe, but I am allergic to apples. Is there something else (pears, for example) that would be a reasonable substitute? Thank you for your help (and your great blog!)
Hi Andrea, you can use pear instead. You are the first person that I heard of being allergic to apples. Would pears be okay for you?
Yes, pears are fine. I’ll try this recipe this week with a pear instead of apple, and report back. Thank you for your prompt reply.
Hi,
I was just want to ask, how long can package kimchi be kept for?
As long as you want or until you can’t stand the potent smell any longer.
Hi,
I just want to ask can package kimchi be kept for the next day or more if its opened the day before?
Thanks for this great and very easy kimchi recipe. I have tried it for four times already and would say that the final product is a-yummy-delight!! I have improvised with some of the ingredients in your recipe based on the availability in our local market. I wanted to try using salted shrimp but I couldn’t find one. Can you show us how to make the salted shrimp on our own?
Nice job putting this together. I’m Korean, and my mom makes her kimchee almost like this – she makes the glue though, and uses korean pears versus apple… I’ve been researching a bit of kimchee, and I think you’re steps are well done. The recipe is also the traditional one.
I tried this recipe last night and added some sliced carrots and daikons. The jars are still fermenting on the counter, but I just had some w/ noodles and it was really good! I’m so pleased w/ the results, I can’t wait to give some jars away to my family members. I omitted the ginger since I don’t like ginger. Last modification was that since I like things extra-spicy, I minced several Thai chili peppers and added the peppers and seeds to the mix. Thank you for being so kind as to share your recipe.
Thanks for sharing your kimchi recipe! one of my favorites Korean food. I would love to know more and learn to do Korean recipes!
Hello…thank you so much for sharing this simple kimchi…do love kimchi & will try to do it myself…thank you Holly 🙂
I luve Korean dishes.
Thanks for these wonderful recipes.
Hi Holly
thank for your posting i make today.
very nice but i can’t get korean chili flake.
i used another brand and mix
korean pepper past can.
Hi Holly!
I am really excited to find this speedy kimchi recipe! I have been following your blog and was super delighted for your detailed versions of kimchi.
I have ran through my local grocery stores and was unable to find salted shrimp (even in lottemart supermarket!) or even a possible substitute for it (e.g. cincalok like the malaysian one) and korean store is very difficult to find in my country.
Do you have any suggestions as to a substitute for the salted shrimp or perhaps if I could make them instead of buying?
Thanks heaps!
You can omit the salted shrimp. Increase the amount of fish sauce and you still will get tasty kimchi.
Hi Holly,
Thanks for the speedy reply.
I was gonna substitute korean salted shrimp with cincalok as I found someone selling it but they told me that in its raw state, cincalok tastes sour.
Instead I found lee kum kee shrimp sauce, saw it was made with shrimp and salt only (although not sure if they used the same small shrimp as korean salted shrimp) so I am gonna give that a go and see how it turns out.
I managed to found anchovy sauce in my local store so in case the lee kum kee shrimp sauce fails, for next batch do you mean I should increase anchovy sauce (by how much?) or use thai fish sauce? Thanks heaps!
Can’t wait for more recipe updates from you, your recipes are really easy to follow and the pictures are just beautiful. <3
The shrimp sauce you mentioned almost sounds like thin belachan to me. Belachan is quite strong to add as it is without being cooked to kimchi since it has very potent smell. Although Lee Kum Kee shrimp sauce looks thinner and maybe less potent? I am not sure.
I will tell you what. Make kimchi filling without the shrimp sauce in the recipe. Take a small portion off from the filling and add in a little bit of the shrimp sauce to it. Taste both filling to see if you can tell the difference. The kimchi filling with or without shrimp sauce won’t have much difference in taste as a filling but it will make a little difference as it ferments with cabbage with it.
If your filling with LKK shrimp sauce taste like (or smell like belachan), I wouldn’t use it. You can make a very decent batch of kimchi without shrimp sauce if you add the seafood stock in the filling, which will make up the flavor.
Most Korean fish sauce is made with anchovies. I think it is a good idea to mix Korean fish sauce with Thai/Vietnamese fish sauce. I personally never tried Thai fish sauce to make kimchi but Many Koreans in abroad do. It works but I highly recommend to use 30-50% less depends on the brand. Check the sodium level. Most Korean fish sauce is about 25-35% sodium intake per serving, and I’ve seen some Thai fish sauce goes upto 70% which is extremely salty. Start with less portion of fish sauce. You can always add more even after you mix the cabbage with the Kimchi filling.
Good luck, Anasthasia! Kimchi making is not an easy task but is very rewarding. I would love to hear how your turns out. Thanks for the compliment. 🙂
Hi Holly,
I have made it! and the flavour is great and I used the LKK shrimp sauce.
I tried it on a small batch and it tasted more delicious with it (sort of add that depth of seafood flavour) so I added it to the rest.
It’s been about 2 days and the kimchee flavour is wonderful although mine turn out very sour not sure why exactly but I have been adding sugar gradually to try to reduce the sourness but up to now it is still quite sour. I think maybe I should have taken the cabbage out of their salt water soak bath faster than the given time.
Thank you for your recipe! Will definitely make it again next time, now I can just make my own kimchi and I won’t have to buy from the store since the ones available here are not so nice.
Yeah! that is great!
I am so glad to hear that the LKK sauce worked very well in the recipe.
I think the reason your kimchi went too sour is either the cabbages were not fully soaked in the salt water, or maybe your room temperature is too warm during the fermentation. The fermentation level can vary depends on the surrounding temperature. In the summer time I usually leave my kimchi only a day in the room temperature, then store in the fridge. They will continue to ferment in the fridge but slower in the speed.
Homemade kimchi tastes much better than store bought for sure!
Thanks for the update, Anasthasia!
Hi! Holly,
Firstly,Iam so Sorry my english is poor.
Thanks for da recipe! I already tried. simple and taste also good (^_^). Me and my freind really like to try korean dish. We were so addicted with kdrama. lol.
I can’t wait to try this, just looked up a Korean store near me. Love me some Kimchi.
Thank you so much for this recipe! I LOVE kimchi, but have been hesitant to try making it because I live in a place where its hard to find the right ingredients. This recipe had things that I could find or easily replicate…. So I tried it!
When I had it all stuffed in a jar, I tasted it…. OH! it was soooo awful!! haha I thought maybe I just dont like ‘fresh’ kimchi. So I let it set on the counter a night, but it was still awful. I put it in the frige for a week and tried again… it was just not good at all! But, it was so pretty and I had made so much, I couldnt throw it away.
It sat in the back of my frige for about a month… taunting me. Till one day I dared a taste and oh em gee…. IT WAS DELICIOUS!! Wow…. really just wow. its sooooo good! Ive eaten half the jar in the last few days. Its great right out of the jar or in cooking. I love it! THANK YOU! Ill never buy kimchi again <3
Hi Holly,
I stumbled upon yr blog while searching for recipe on citreon tea. I have been an ardent fan for korean food and love eating kimchee. After reading your kimchee recipe, i would like to try making it. It sounds interesting and easy to make since you have explained them very clearly. Thank you very much for the recipe. I am glad that I have finally found a step by step and easy to follow recipe.
Thank you SK Lee. Hope you can give a try on kimchi making. It requires some time but worth it. Take care!
Thanks for your recipe! I wanna know how much salt I should use if I use fine sea salt? And how much salt and chili flakes is appropriate if I want to make it more bland but still has taste? 감사합니다:)
If using fine salt, perhaps cut down about 1/2. Also you can use less chili to make it blend, up to 1/2 the amount but your kimchi won’t be as red/orange. I would cut down about 30%.
Hi Holly,
Thank you for sharing this recipe. I love Kimchi I bought every two months but I don’t know how to make. I am please to find your recipe so clear with photos so I could understand what the ingredients to use how is look like. I am from Vietnam living in Dhaka. There is Korea supermarket I think I could find all the ingredients there. Thank again.
Hi Holly!
I ran into your blog and got curious,since I love trying new food. I’m a Filipino and my problem would be where to find some of the ingredients of Kimchi I really wanted to try it and taste the very famous food of Korea. I’m very excited to try and taste it..
Hi Noemi
Best place to get Kimchi ingredients will be Korean grocery stores. I believe there would be some in Manila since there are many Koreans living there. You should be able to find Korean chili flakes, fish sauce, shrimp sauce, and maybe, even cabbages.
Hi Holly, I stumbled upon your website to make kimchee. I linked your blog to my post. I am in the process of trying it myself. Thank you for sharing your recipe.
Hi, I’m a kitchen newbie and I’m going to try more recipe from your blog after my first successful spicy dummy pork. ^_^
My location is in Penang Malaysia, if I can’t get the korean salted shrimp paste, can I replace it with the cincalok? As I saw the ingredient is also shrimp and salt.
I have seen them at the store. Never tried though but if they are just shrimp and salt, it should work. I am glad that you liked my pork recipe. Good luck on making kimchi. I am visiting Penang in December and I am quite excited.
I am going to make kimchi this weekend, but can I use rice flour with this recipe instead of rice??
Of course. You need to cook into rice glue to add to the filling, though.
Thank you very much.. I recently soak cabbage in salted water. I am so excited:-)
I have one question, I coudn’t find anchovy sauce, can i use fish sauce?
Many thanks.
Charos
Yes, you can use fish sauce. But use a little less amount if the fish sauce has more sodium (usually Thai fish sauce is quite salty). You can always add more if you need.
Thank you. I put too much onion in mine (I don’t know why) but it is soo good!
Glad that you liked it. You can never put too much onion. I love onions!
Hi Holly! I’ve recently started following your blog and I wanted to tell you how lovely it is. My husband is American (I’m British) and we lived in Seoul for 2 years back in 2002. We fell in love with the food and I miss it terribly, especially now that we’re living in London and it’s not as easy to get good Korean food. I’m thrilled to see this recipe for easy kimchee since I crave it ALL the time. I could eat it every day. Now I have to find somewhere to buy the ingredients…
Hi Emily, I am glad that you found my blog, too. I hope you can find some good Korean ingredients to make your kimchee soon.
Thanks for this recipe!
I’ve made a few mak kimchi recipes before and so far this one is my fave, especially with the leftover rice tip. Though I had to make some adjustments (forgot to get ginger, out of fish sauce so I used soy sauce, instant dashi instead of anchovy stock, and I only used green onion and added strips of radish), it turned out wonderful! I also appreciate the tip on saving the leftover paste and using it for a quick kkadugi, which I did and is also delicious.
I just really need to get my hands on some good Korean sea salt, and better cabbage next time, though that’s hard to find here. I think I’ll grow it in the garden next year, maybe even this year though it’s a bit late to start from seed. Hm.
Thanks again! I love your blog.
Hello Holly !
I had spotted your 3 posts about making the long version a long time ago but was hesitant given the complexity. I finally tried this fast version and it gave amazing results ! Now we are trying the concumber..
Do you think it is possible to make brocoli-kimchi ? I would love to mix crunchiness and spiciness ! Do you think it is better to drown it into salted water, or to cover it with boiling salted water like the concumber ??
thank you for your advice
greetings from Paris !
Hello Thomas
Yes, it is possible to make broccoli kimchi. You wan to sprinkle a little bit of (about 1-1 1/2 tablespoon) coarse sea salt over 1 head of broccoli and let it sit for about 15 minutes so that broccoli gets pre-seasoned. Rinse and spin well to get rid of moisture. Add chili fillings and toss.
I am so glad to hear that the easy kimchi version came out great for you.
Jessica
I am so happy to hear that your kimchi turned out so well. It looks really good from the photo. Yes, you should be in the kimchi business.
For the mandu, try chopping your noodle smaller. Easier to assemble that way. Also maybe reduce the amount of tofu and increase the pork. It will be quite bland to taste if there is too much tofu. You can always adjust amount of each ingredient for your liking. Don't forget the dipping sauce, either!
Thanks for taking your time to write me. Comments from my readers like you do motivate me to continue the blogging.
Hi, Holly!
I wanted to let you know my kimchi was a big success and now my husband's family are teasing me that I should have a kimchi business! One sister-in-law told me she didn't expect my kimchi to look so professional, my husband told me it tasted authentic and everyone raised their chopsticks with kimchi in an ode to kimchi during our lunch. 🙂 We also tried your mandu recipe, but I think I need to practice that some more as it was pretty bland, and my filling wasn't small and even enough. Here's a picture of my kimchi and the family making mandu! Thanks for your recipe and for explaining it step by step, making it easy for this Mee-gook mind to follow along! 🙂
Kam-sam-needa!
Fresh taste! I Surfing your yummy blog.
Thanks Mary. I am glad that you found my site. Hope you can find a good recipe in my blog that you can try. Let me know if I can help you with anything.
Thanks, Holly! After looking at the printed recipe, I realize you had written some of the details that I was asking about. Oops! Sorry to make you repeat yourself. I'm so excited to try this. I had to special order the Asian cabbage since K-town only sold boxes of 50 heads of cabbage! I've been slowly gathering the ingredients with the help of a Korean girlfriend and hope it turns out well! I will let you know. 🙂
Hi Jessica
If you are using Veitnamese fish sauce, use about 2 tablespoon first along with Korean salted shrimp in the recipe. As for the leftover rice, use about 1/3 cup (room temp).
After you make kimchi with cabbage, taste it to check the seasoning. It should be slightly saltier that you would hope for. The water in the cabbage will continue to ooze out and dilute the sodium level. You can always add more fish sauce if you need.
Leave kimchi on the counter 1-2 days to ferment (no more than 2 days, otherwise it will be too sour), until you see a little bubbling gas forms, then, put in the fridge to slow down the fermentation.
Good luck! and let me know how it turns out.
Hi, Holly!
I'm an American married to a Korean man and excited to try this mak-kimchi. Thanks so much for posting it! I'm actually making it this week to take to a Korean family gathering this weekend.
Can you please tell me how much Vietnamese fish sauce I can use for the stock since I don't have anchovies? Also, can you tell me how much leftover rice I should use in the rice paste? I don't have time to practice, so hope to get it right the first time!
Also, will 3-4 days be enough time to ferment?
Thanks in advance!
Jessica
you know that this cabbage here is called "Pekin cabbage"?:)
Thanks for letting me know. I like the name.
We have a Korean market so close to my house and each week they make kmchee and if I happen to be in there on the day they make it the whole place smells wonderful. If this is the easy version…wow, I can't imagine how much you have to do to make the authentic cabbage kimchi . Must be a labor of love. 🙂
This sounds delicious and I need a recipe for kimchi. This is my first visit to your blog, so I took some time to browse through your earlier posts. I'm so glad I did that. I really like the food and recipes you share with your readers and I'll definitely be back. I hope you have a great day. Blessings…Mary
Thanks for pointing out the mistake, Lucy. I will fix it. I am glad that you liked the mak-kimchi.
Thanks. Hope you can try to make kimchi this year. This Mak-kimchi would be perfect for the beginner.
Hi Holly, I made the kimchee and it turned out great! I didn't read your recipe properly though and use 2 cup of stuck and about half a cup of rice, so I think the consistency is slightly wrong. I'm going to try again after I've finished eating and sharing this batch with friends! Have noticed a minor mistake on step 4 of the recipe, you forgot to include the rice going into the blender. Thank you again for this MAK recipe, anything mak is good in my kitchen! x
Great post. Kimchi is on my list of things to make this year (I love the flavor, just have never made it). I liked your longer recipe, but this one is more doable for a novice. (David Chang's recipe in Momofuku is also quite good.) As always, a well written and presented recipe – thanks.
all the food you make seems to be delicious, i have to try the teriyaki chicken.
looks like a beautiful recipe. i can't wait to try it.
Hi Mark
Thank you for the comment. Yes, kimchi making is a little challenging at first, but keep trying. You will get the feel for a good kimchi as you keep challenging.
Gorgous. I'm an American guy, who worked in Korea for about 6 months,
and fell in love with the food. (The people, and the beautiful country, are
pretty nice too). I love finding a slightly easier way to make kimchi. I
actually have sort of skipped the seafood stock bit, although I've put
in anchovies. I'll try it this time. The first time I made it, it was way
too salty; but I've gotten a little better at it. I figure: keep trying,
and eventually I'll get it just right. Mark
You can use Thai (or Vietnamese) fish sauce with a little less amount. Have fun making kimchi this weekend and let me know how it turns out.
You are welcome. Hope you get to try this recipe soon.
I use Korean anchovies that I purchased in my hometown in Korea (the best of the bests). I store them the freezer and they can last forever. You can buy Korean anchovies at the Korean grocery stores. For the stock, you can use local anchovies but I would recommend dried fish I often see at the local groceries. They will make your kimchi very flavorful as well.
For cabbage or any vegetables or fruits, I always wash with baking soda. Soak vegetables with 1 tbsp baking soda in cold water for 5-10 minutes (or scrub if you can), then rinse out. It cleans out pesticide very well and seems to improve its crispness.
No matter where you shop most vegetables are loaded with pesticide unless you purchase trusty organic products.
Thank you so much for sharing this wonderful food. Connie
oh this looks so good, and i have all the ingredients at home so will make this wkend! only thing i don't have is anchovy sauce – what can i use instead? Thanks holly! x
Fish Sauce is fine
This recipe made Kimchi more delightful and easy to make. Thanks a lot!
Hi Holly
I live in KL, Malaysia, With regarding to the anchovies, do you buy yours from a Korean grocery shop or you can just use those from the market? Secondly, can you leave out the bottled salted shrimps?
I was told that the Malaysian cabbage (those grown in Cameron Highlands) is loaded with pesticides. How do you clean yours?
Thanks for the amazing post, once again.
oh my this looks so goooood
my korean hubby will be so impressed!
I am salivating!!! I should be going to bed soon but now, I have an intense desire to eat rice with kimchi! I look forward to trying my hand (a first) at making it this weekend. Thank you for the step by step photos. Lovely!
That's one nice looking mak-kimchi, Holly!
Two things I have always noted when it comes to Korean food are: 1. they are typically colorful; and 2. they are rife with vegetables.
I generally neither have the tie or inclination to make Kimchi, so when I do get the urge, I buy some from one of the many Korean places here in Manila.
Usually, I prefer to eat yook gae jang or bulgogi (yeah, meat!).
Your images of the preparation are alays great, thus it's no wonder you have so many followers.
The advantage to this type of kimchi is that it is very easy to make a giant batch and store in quart jars. I sell my homemade kimchi and I always use this method. Makes the whole process go faster.
oh i love this!!! thanks for sharing
Thanks for the recipe. I just run out of my radish kimchee, I'll try this easy version.