Old-Fashioned Deep Dish Apple Pie
Old-Fashioned Deep Dish Apple Pie — tall, flaky, and full of apples. With a homemade crust and layers of spiced filling, this bakery-style pie bakes high and slices beautifully.
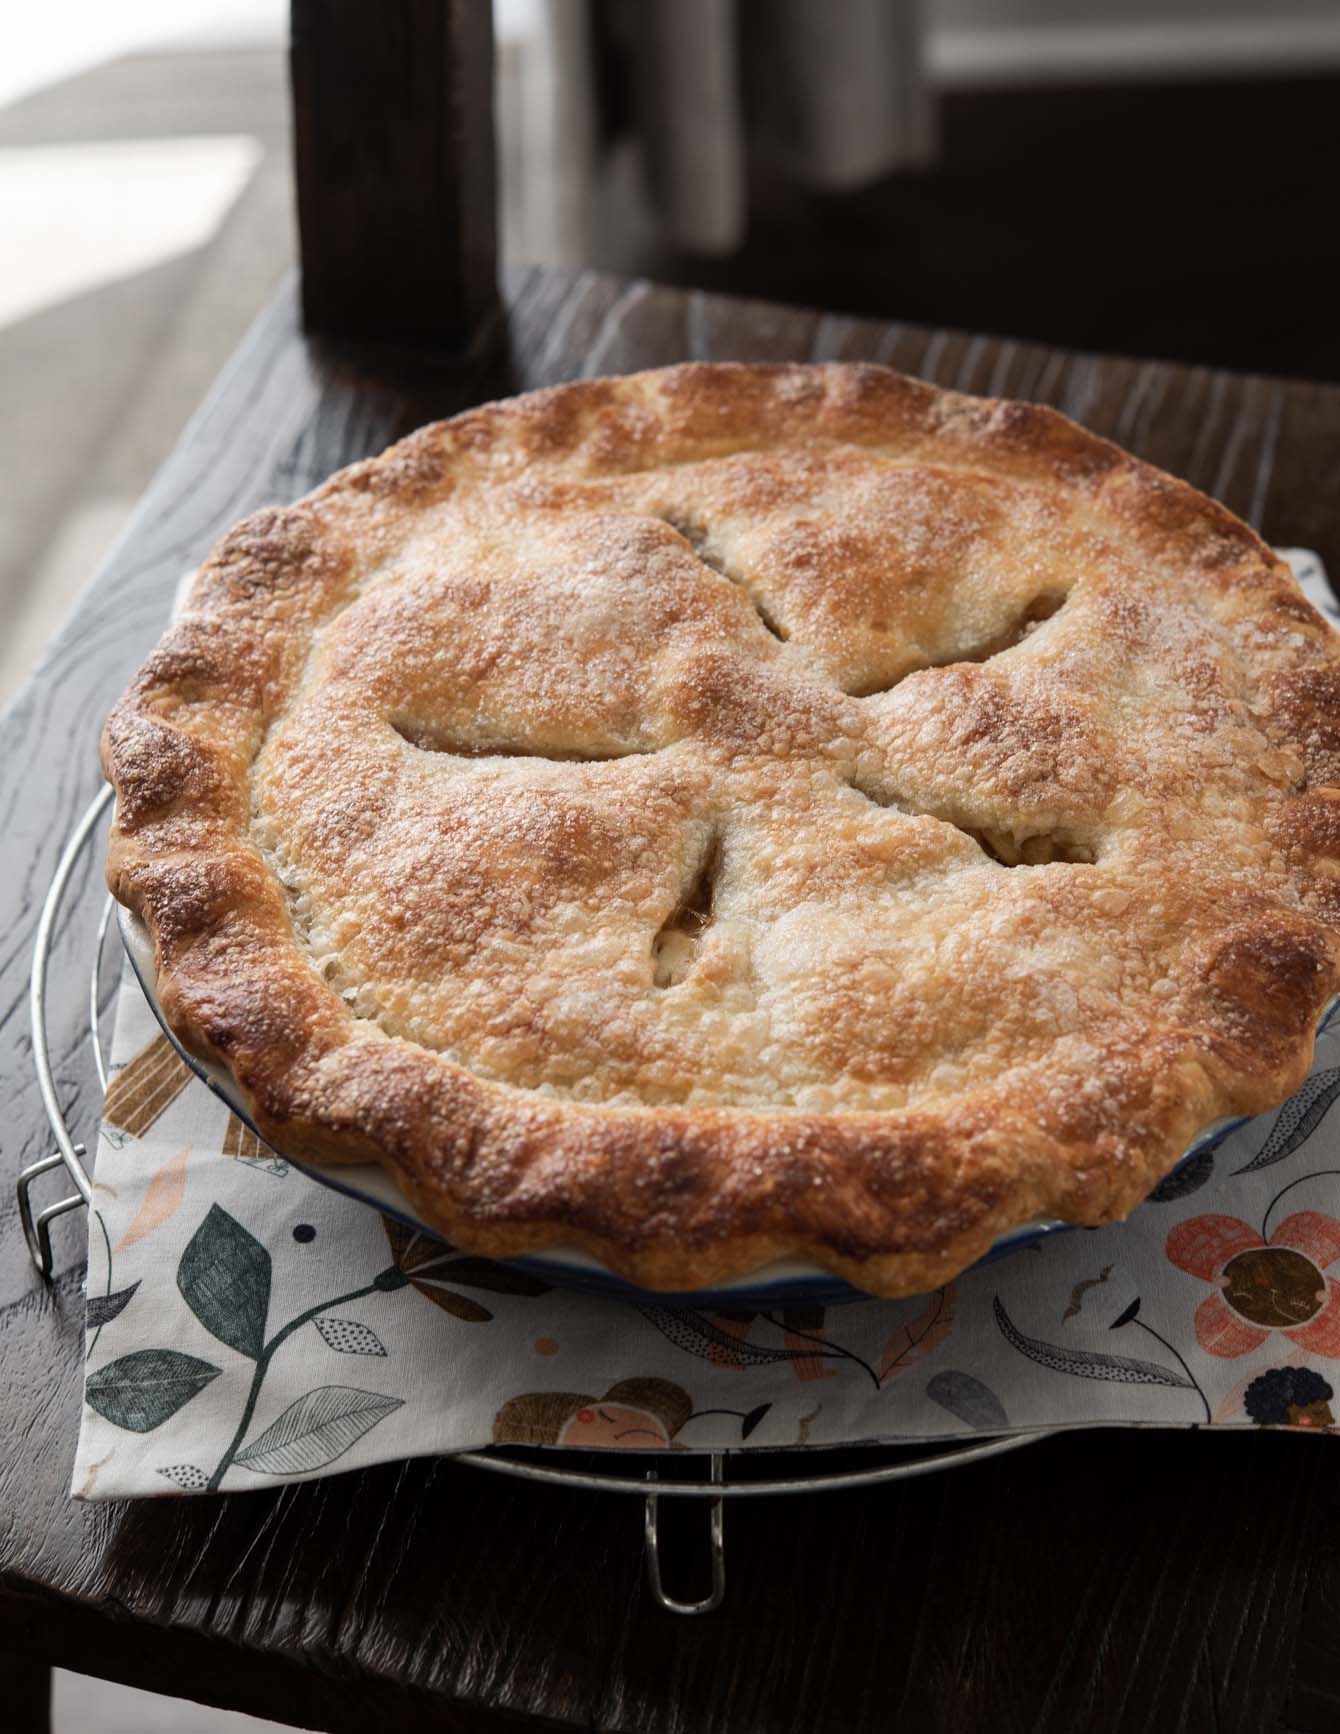
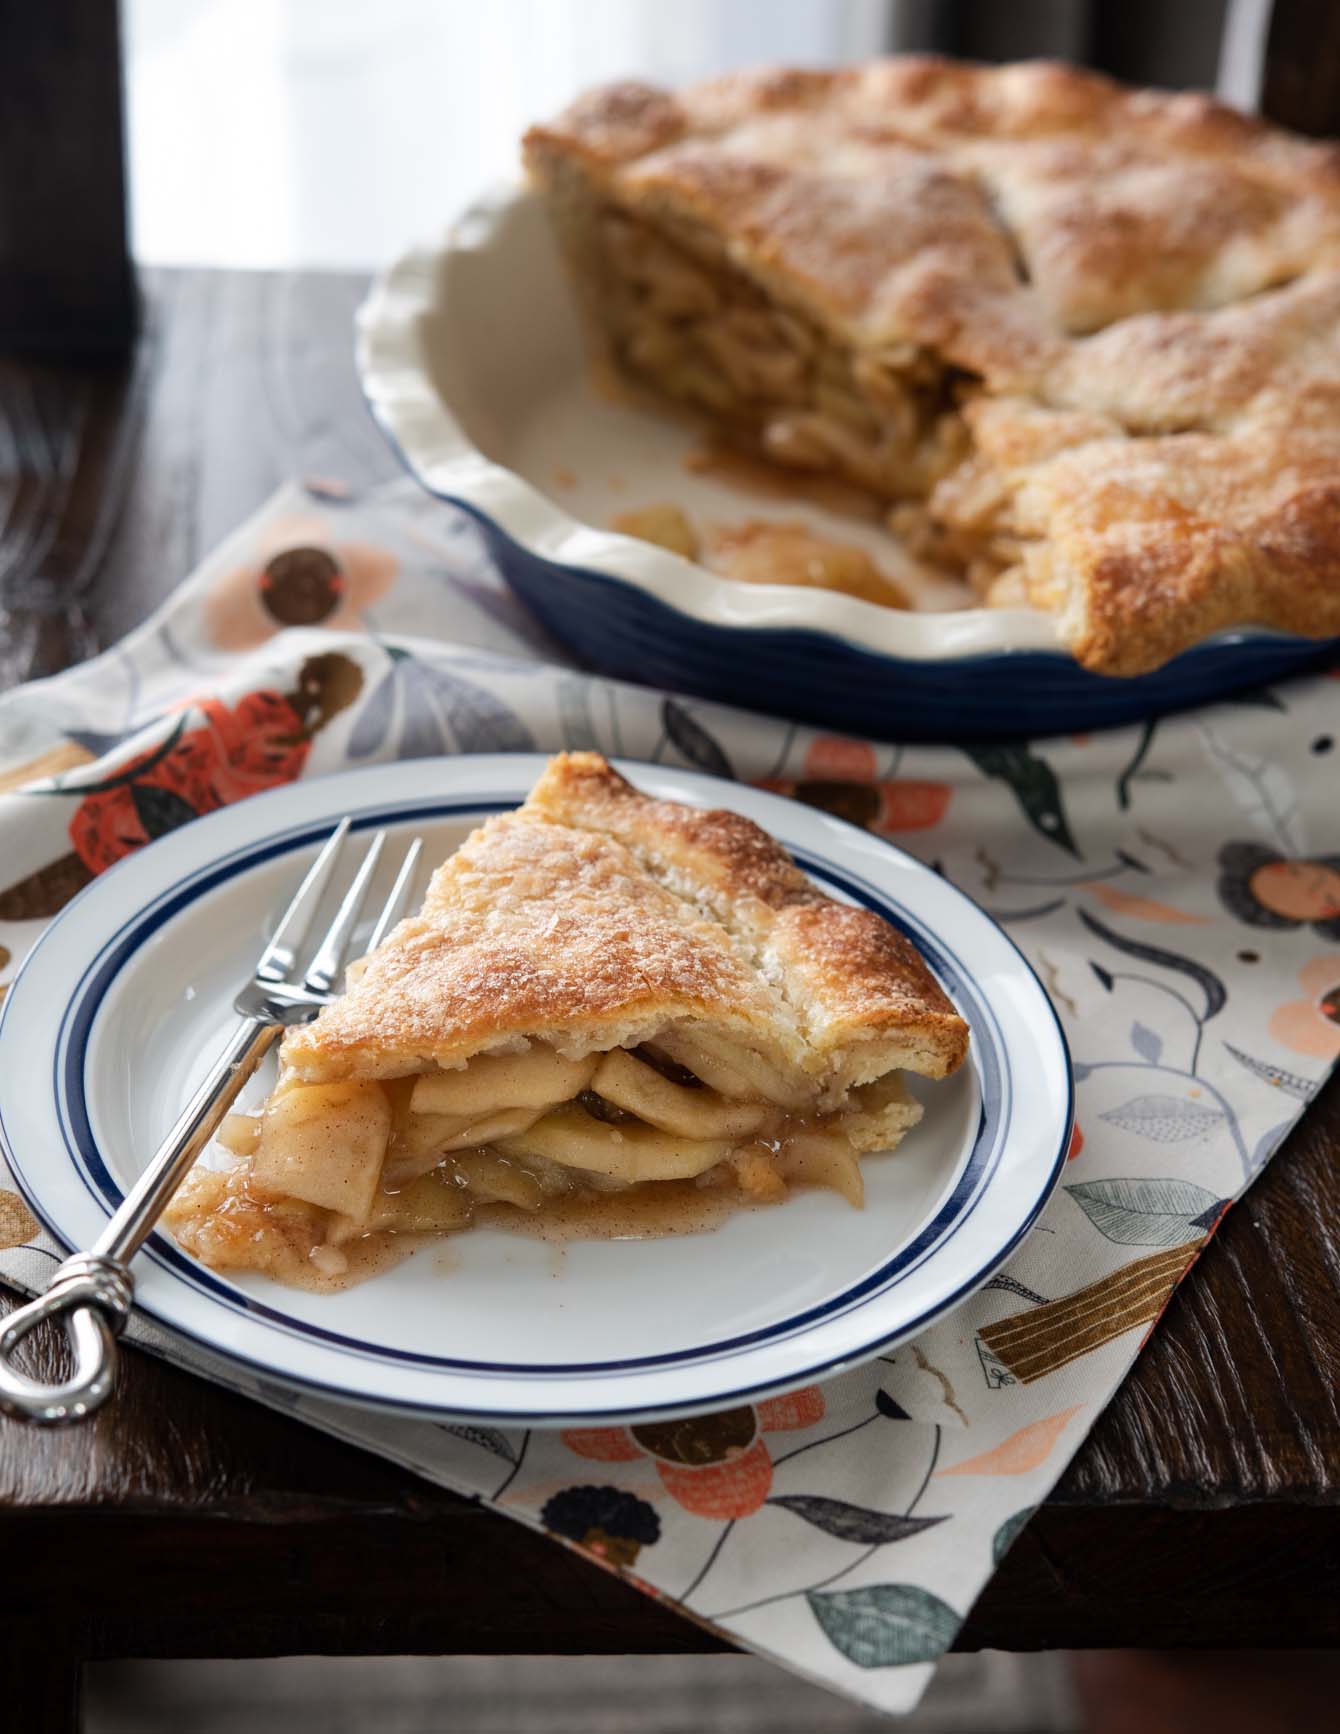
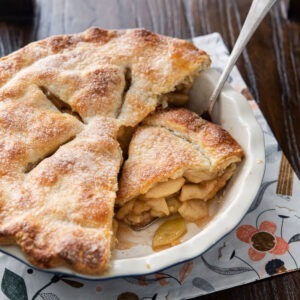
Apple pie is the star of any holiday table, and this deep dish version consistently gets all the attention. With its towering height and flaky, golden crust, it brings a rustic charm that feels like fall in every bite.
I’ve baked this pie for Thanksgiving every year since moving to Virginia, and it always disappears first from the dessert table. Family and friends ask for it by name — it’s become the pie they expect me to bring.

Get new recipes via email:
What makes this recipe different is the method. By pre-cooking the apple filling for just a few minutes, the apples soften without turning mushy, and the filling sets without leaving a gap under the crust.
The result is a homemade pie that looks bakery-perfect yet keeps all the comfort of a classic.
Best Apples for Baking Pies
When it comes to pie baking, both tart and sweet apples can work beautifully. Here are some top choices:
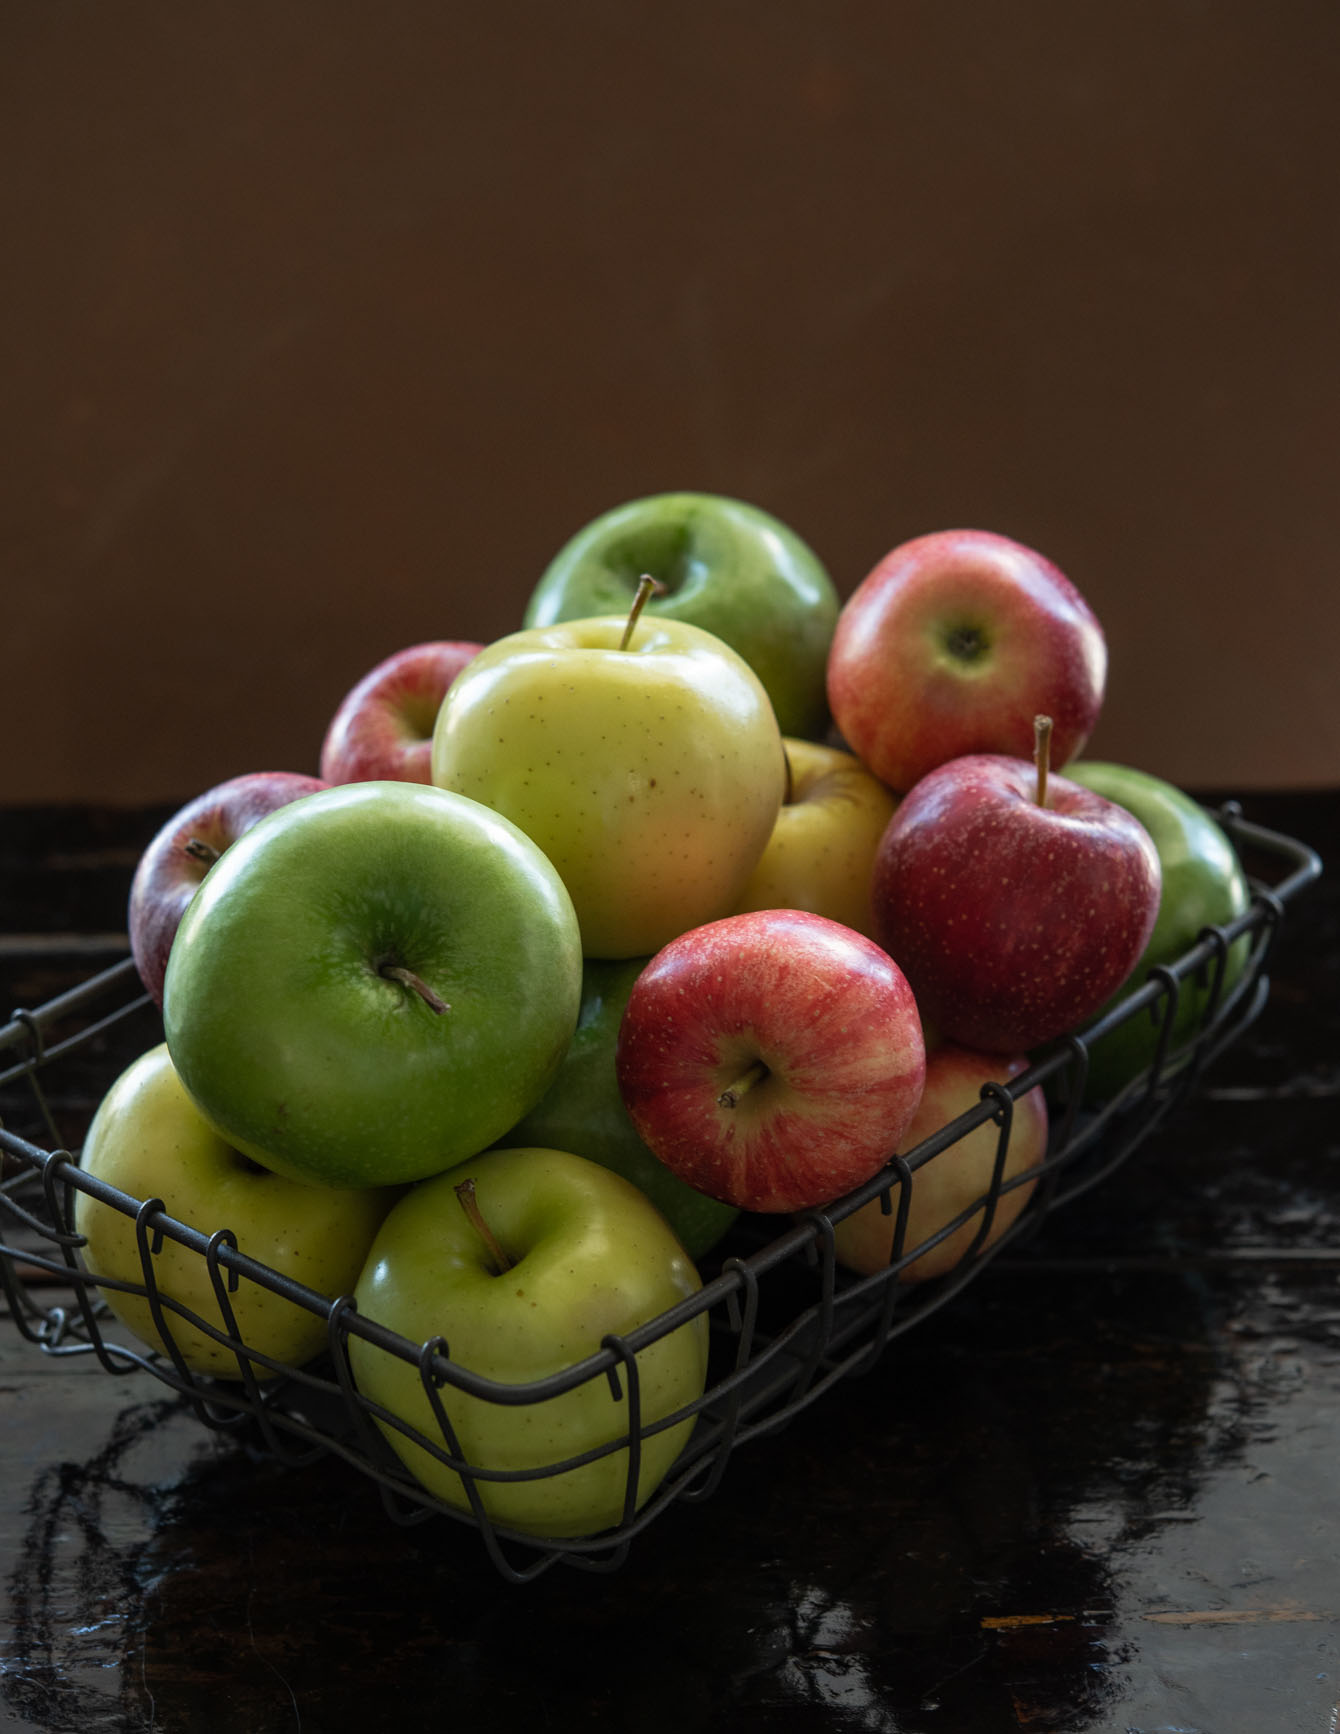
- Granny Smith, Jonagold, and Pink Lady – These apples are tart, firm, and hold their shape well, making them ideal for pie baking. Pink Lady adds a crisp texture, while Jonagold brings a sweet-tart balance.
- Honeycrisp, Gala, and Braeburn – These mildly sweet apples hold their texture and release little liquid during baking. Honeycrisp is a favorite for its crunch, while Gala and Braeburn offer a well-balanced sweetness.
- Golden Delicious and Northern Spy – Golden Delicious has a mild flavor and softens easily, so it’s best paired with firmer apples like Northern Spy, which is sweet, slightly tart, and perfect for fall pies.
- McIntosh & Cortland – While often considered baking apples, these tend to get too soft and mushy when baked. They’re better suited for making applesauce.
Tip: Use 3-4 different apples—most people stick to one type, but mixing varieties gives your pie a better balance of flavor and texture. After testing different mixes, I found that Granny Smith gives the tart bite, Gala softens with gentle sweetness, and Golden Delicious fills out the body of the filling.
For more delicious apple desserts made with baking apples, try my Apple Brownies or Soft Apple Cookies. Both are cozy fall treats that are easy to make and perfect for using up extra apples.
Perfect Pie Crust
The key to an outstanding apple pie starts with a perfectly buttery, flaky crust. Homemade crust brings a tenderness and texture you just can’t beat. Try my lard and butter pie crust recipe, which blends the richness of butter with the lightness of leaf lard for the best of both worlds.
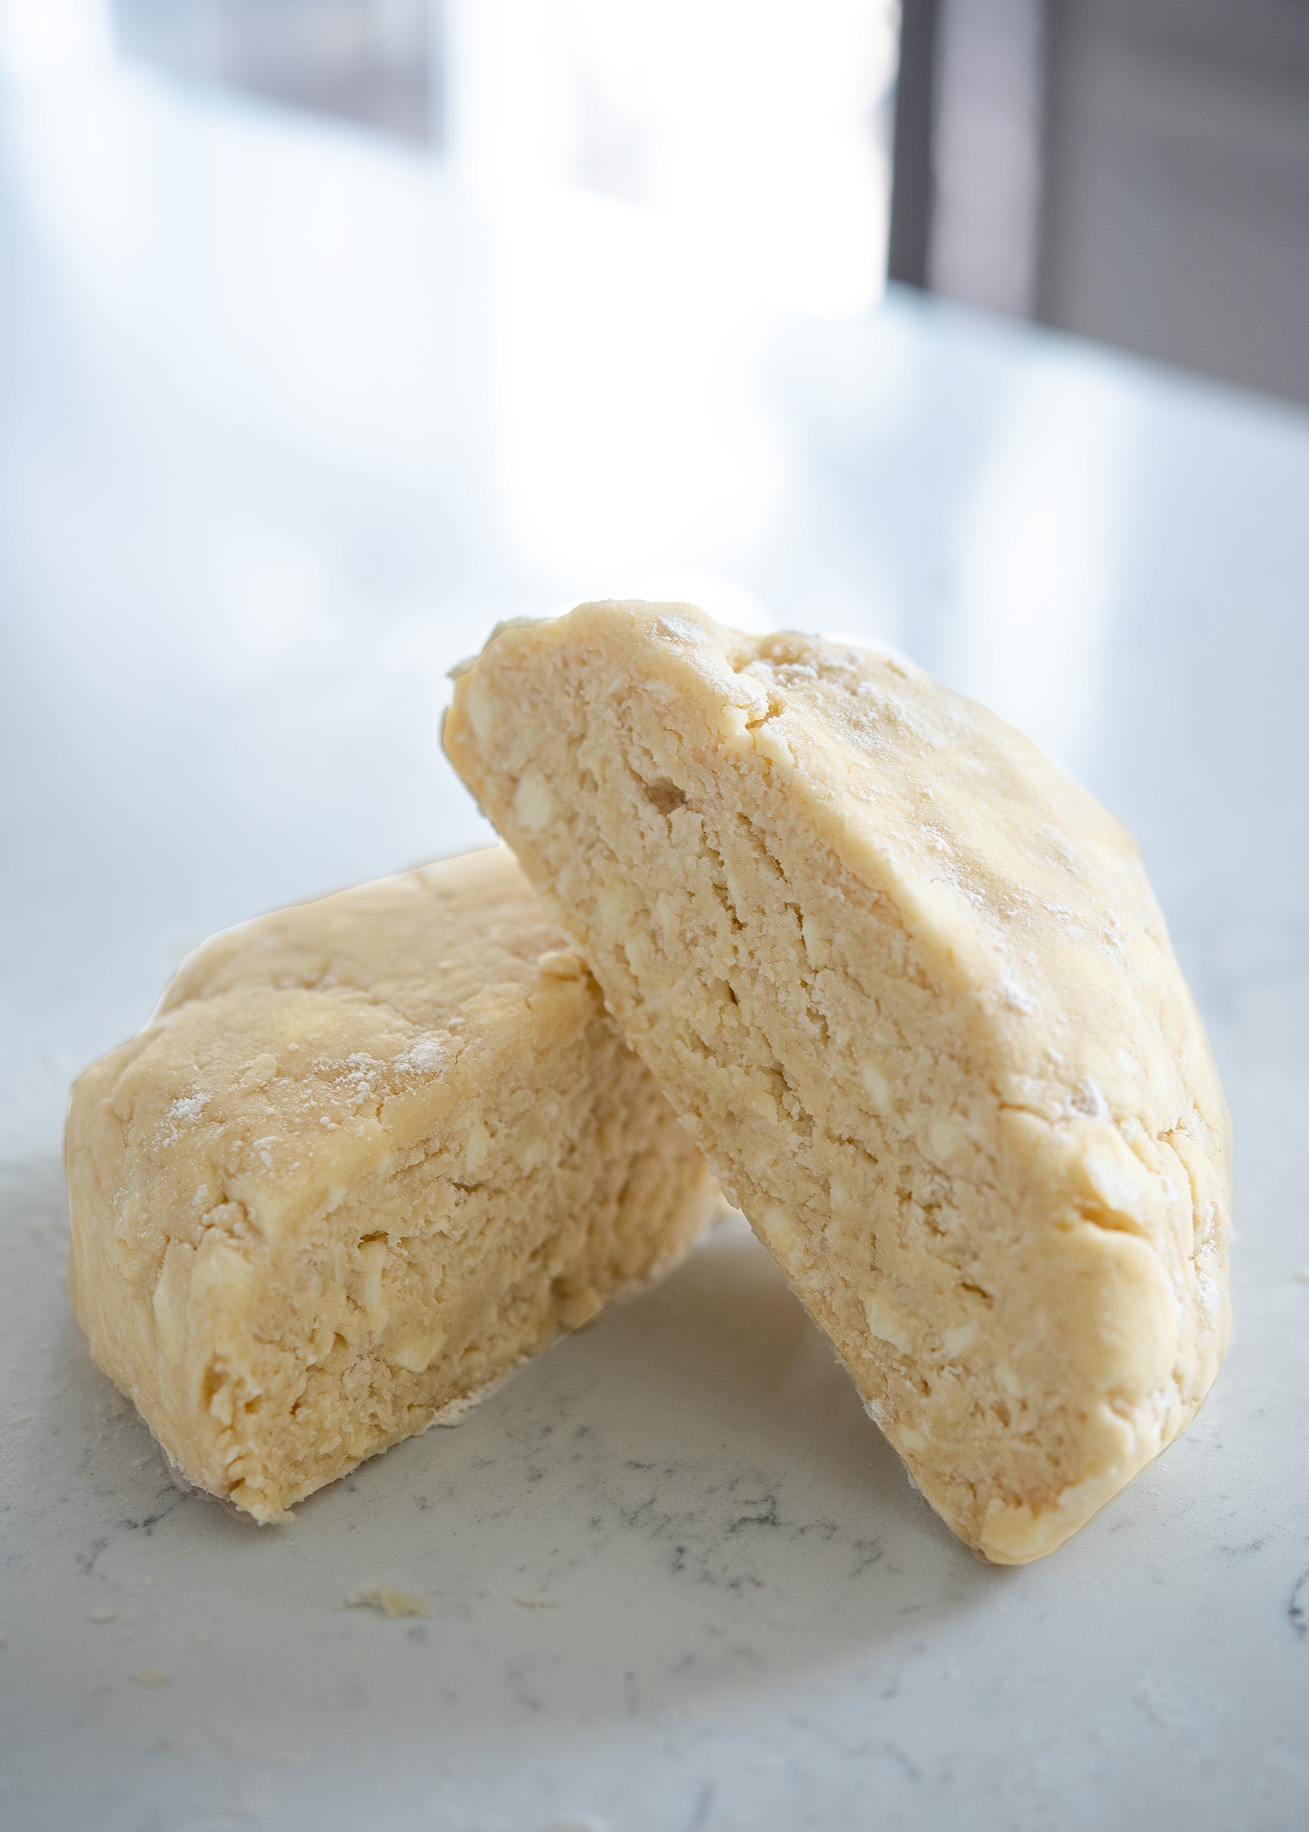
Once you try this pie crust recipe, you won’t go back to your old methods. Plus, it can be made ahead and stored in the fridge or freezer until you’re ready to use it.
How to Make Deep Dish Apple Pie
You don’t need fancy equipment to make a pie, but for this tall apple pie, a deep dish pie pan is a must.
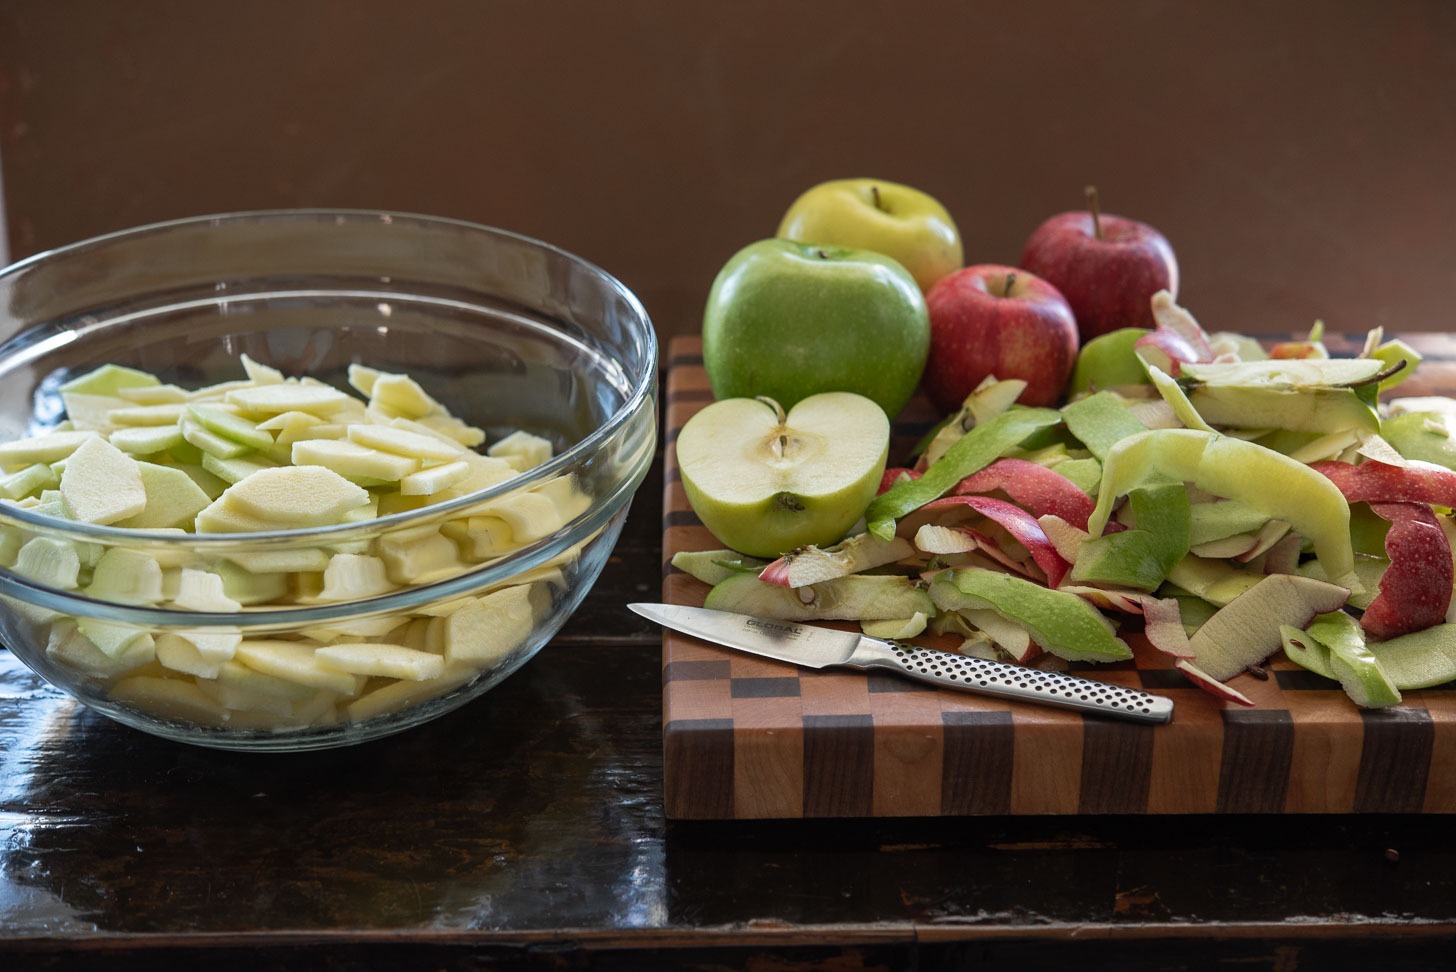
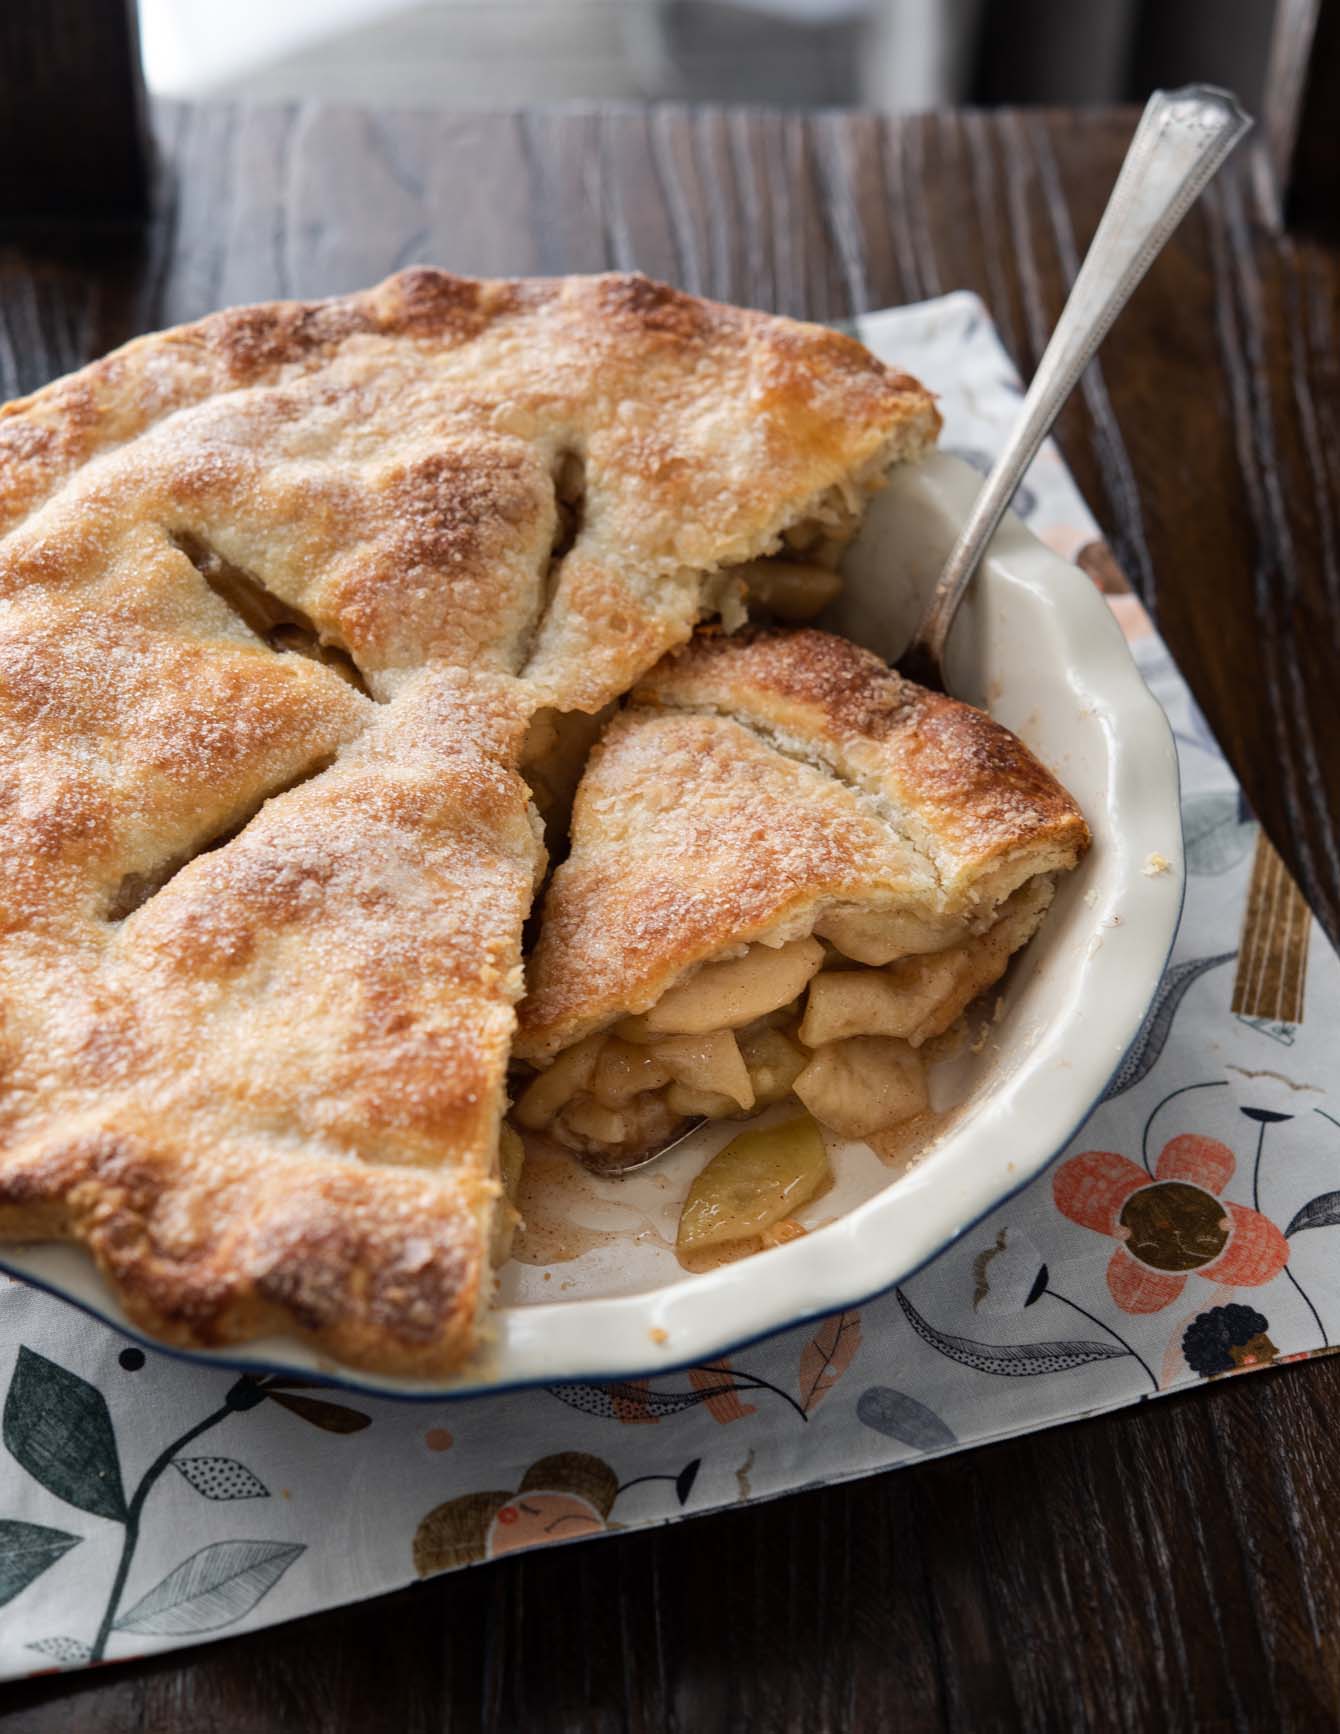
Prepare the Apples. Peel, core, and slice the apples evenly so they bake at the same rate. You’ll need about 12 cups of fruit for a true deep dish pie.
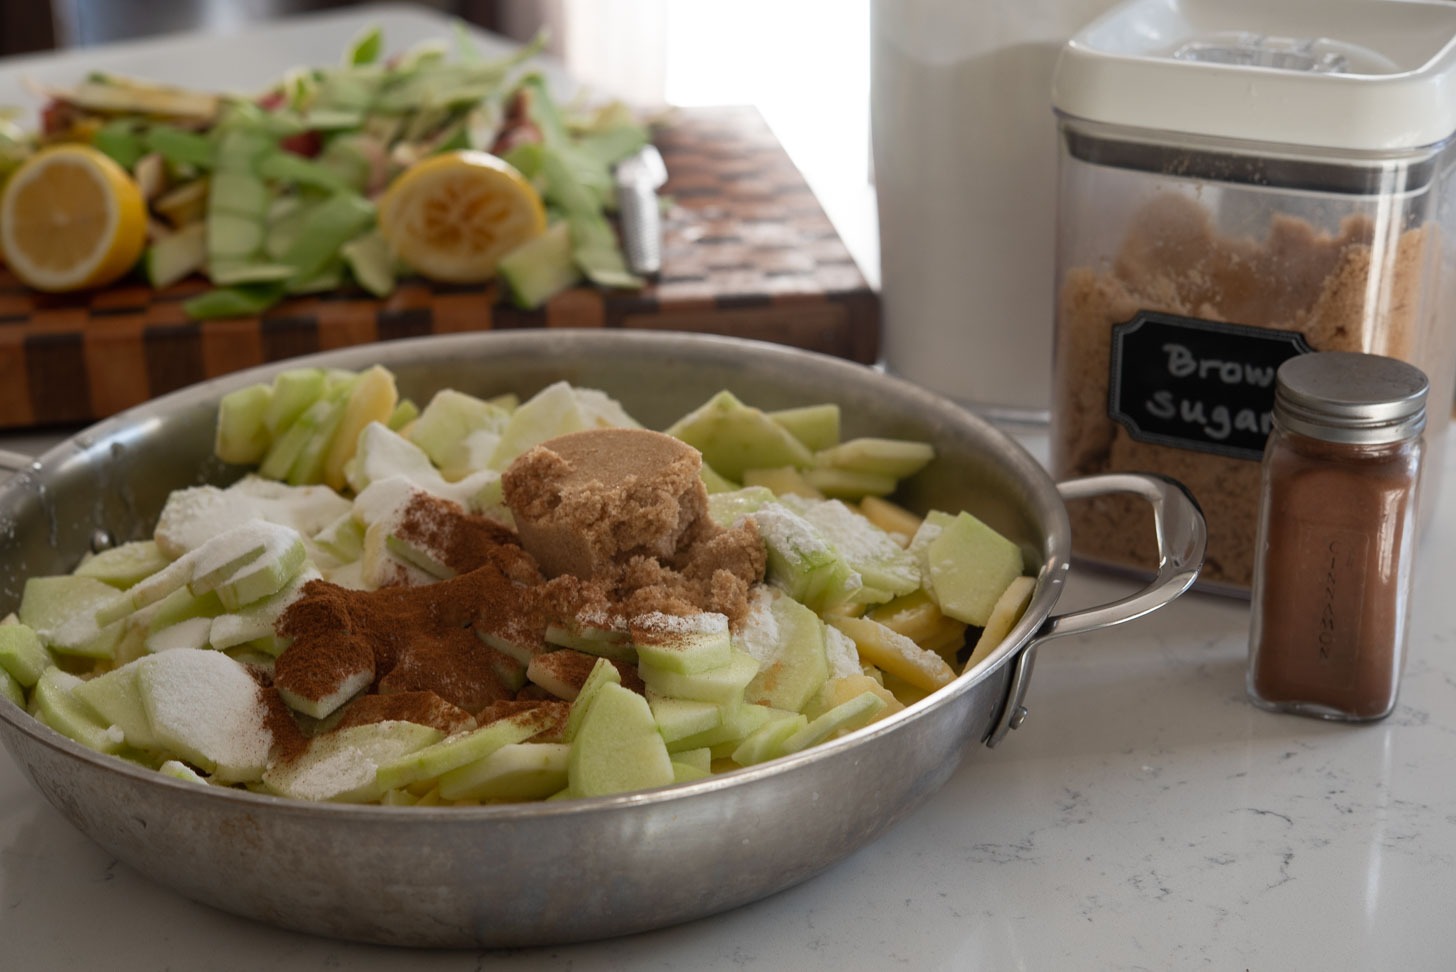
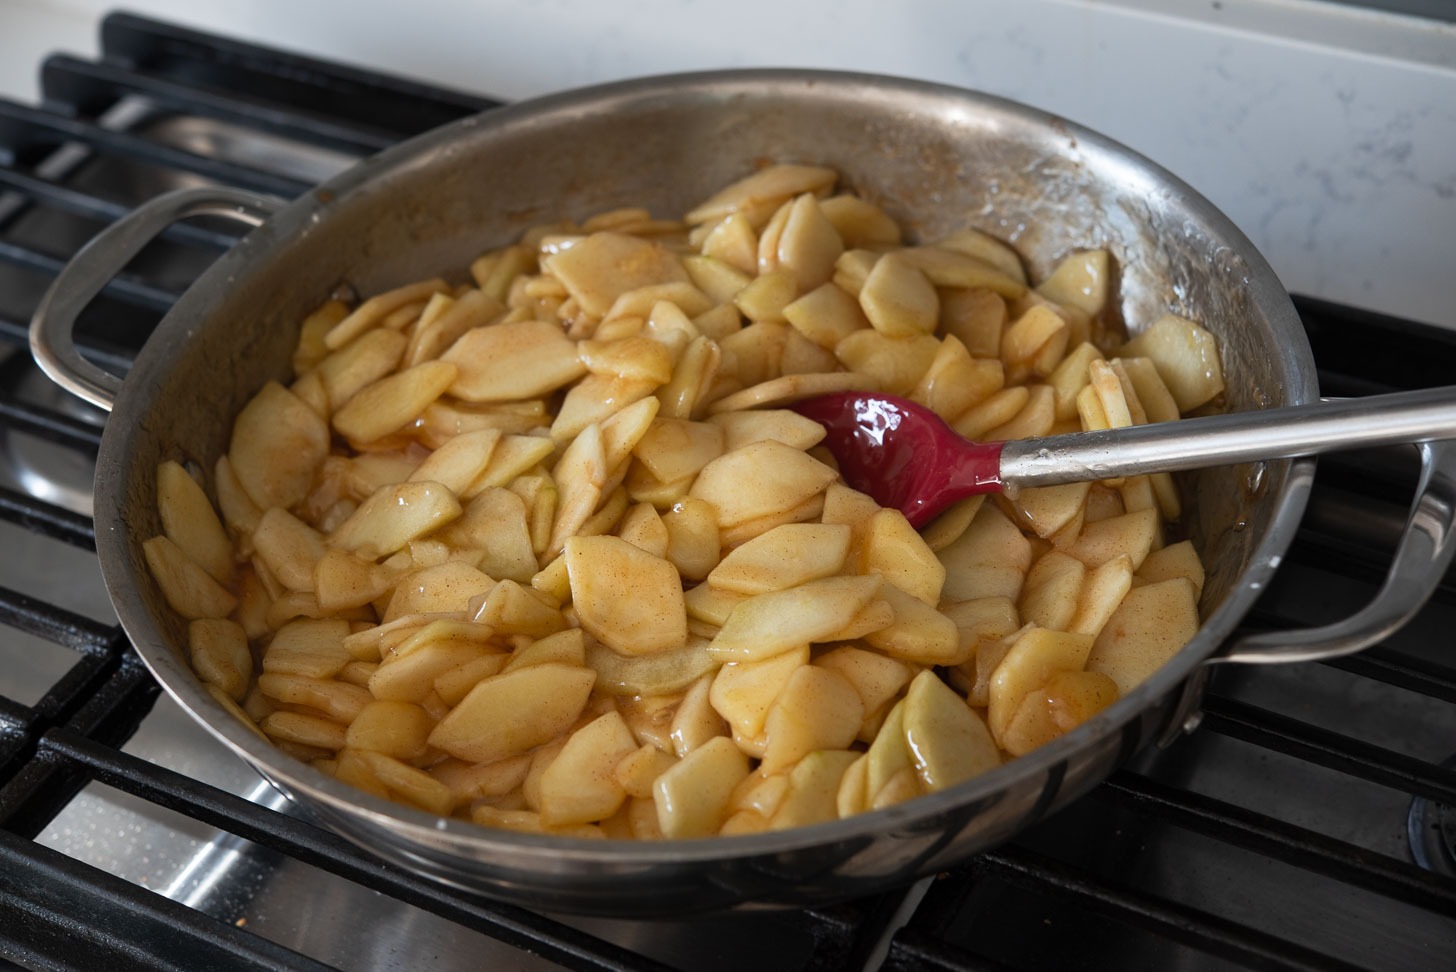
Pre-Cook the Filling. Simmer the apples with sugar, cinnamon, and lemon juice for about 5 minutes. This step keeps the fruit tender but intact, and it prevents that big gap under the crust once baked.
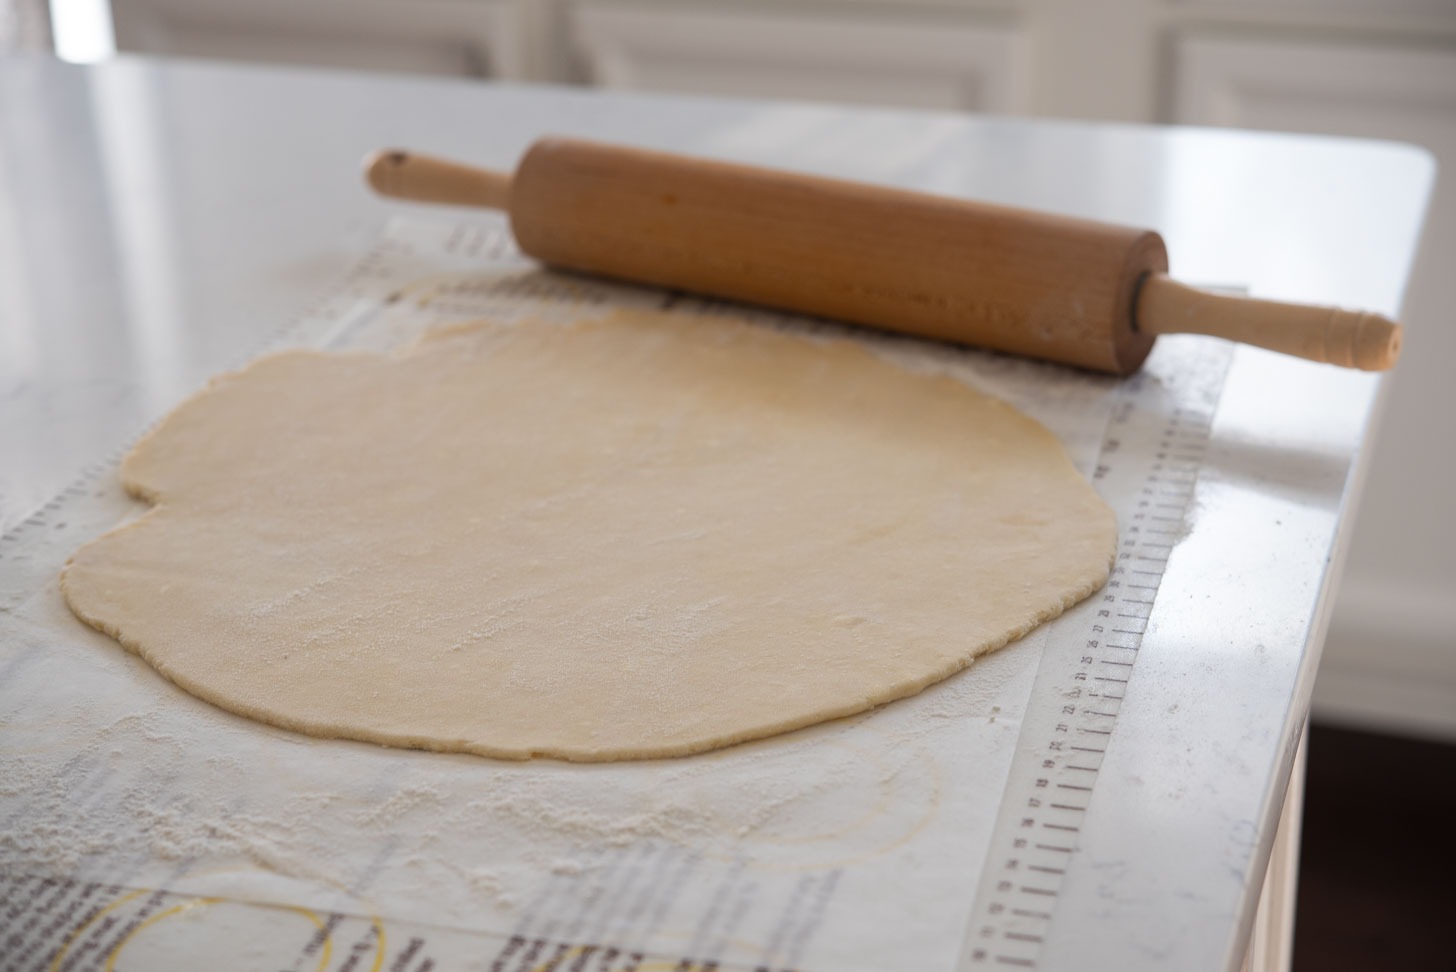
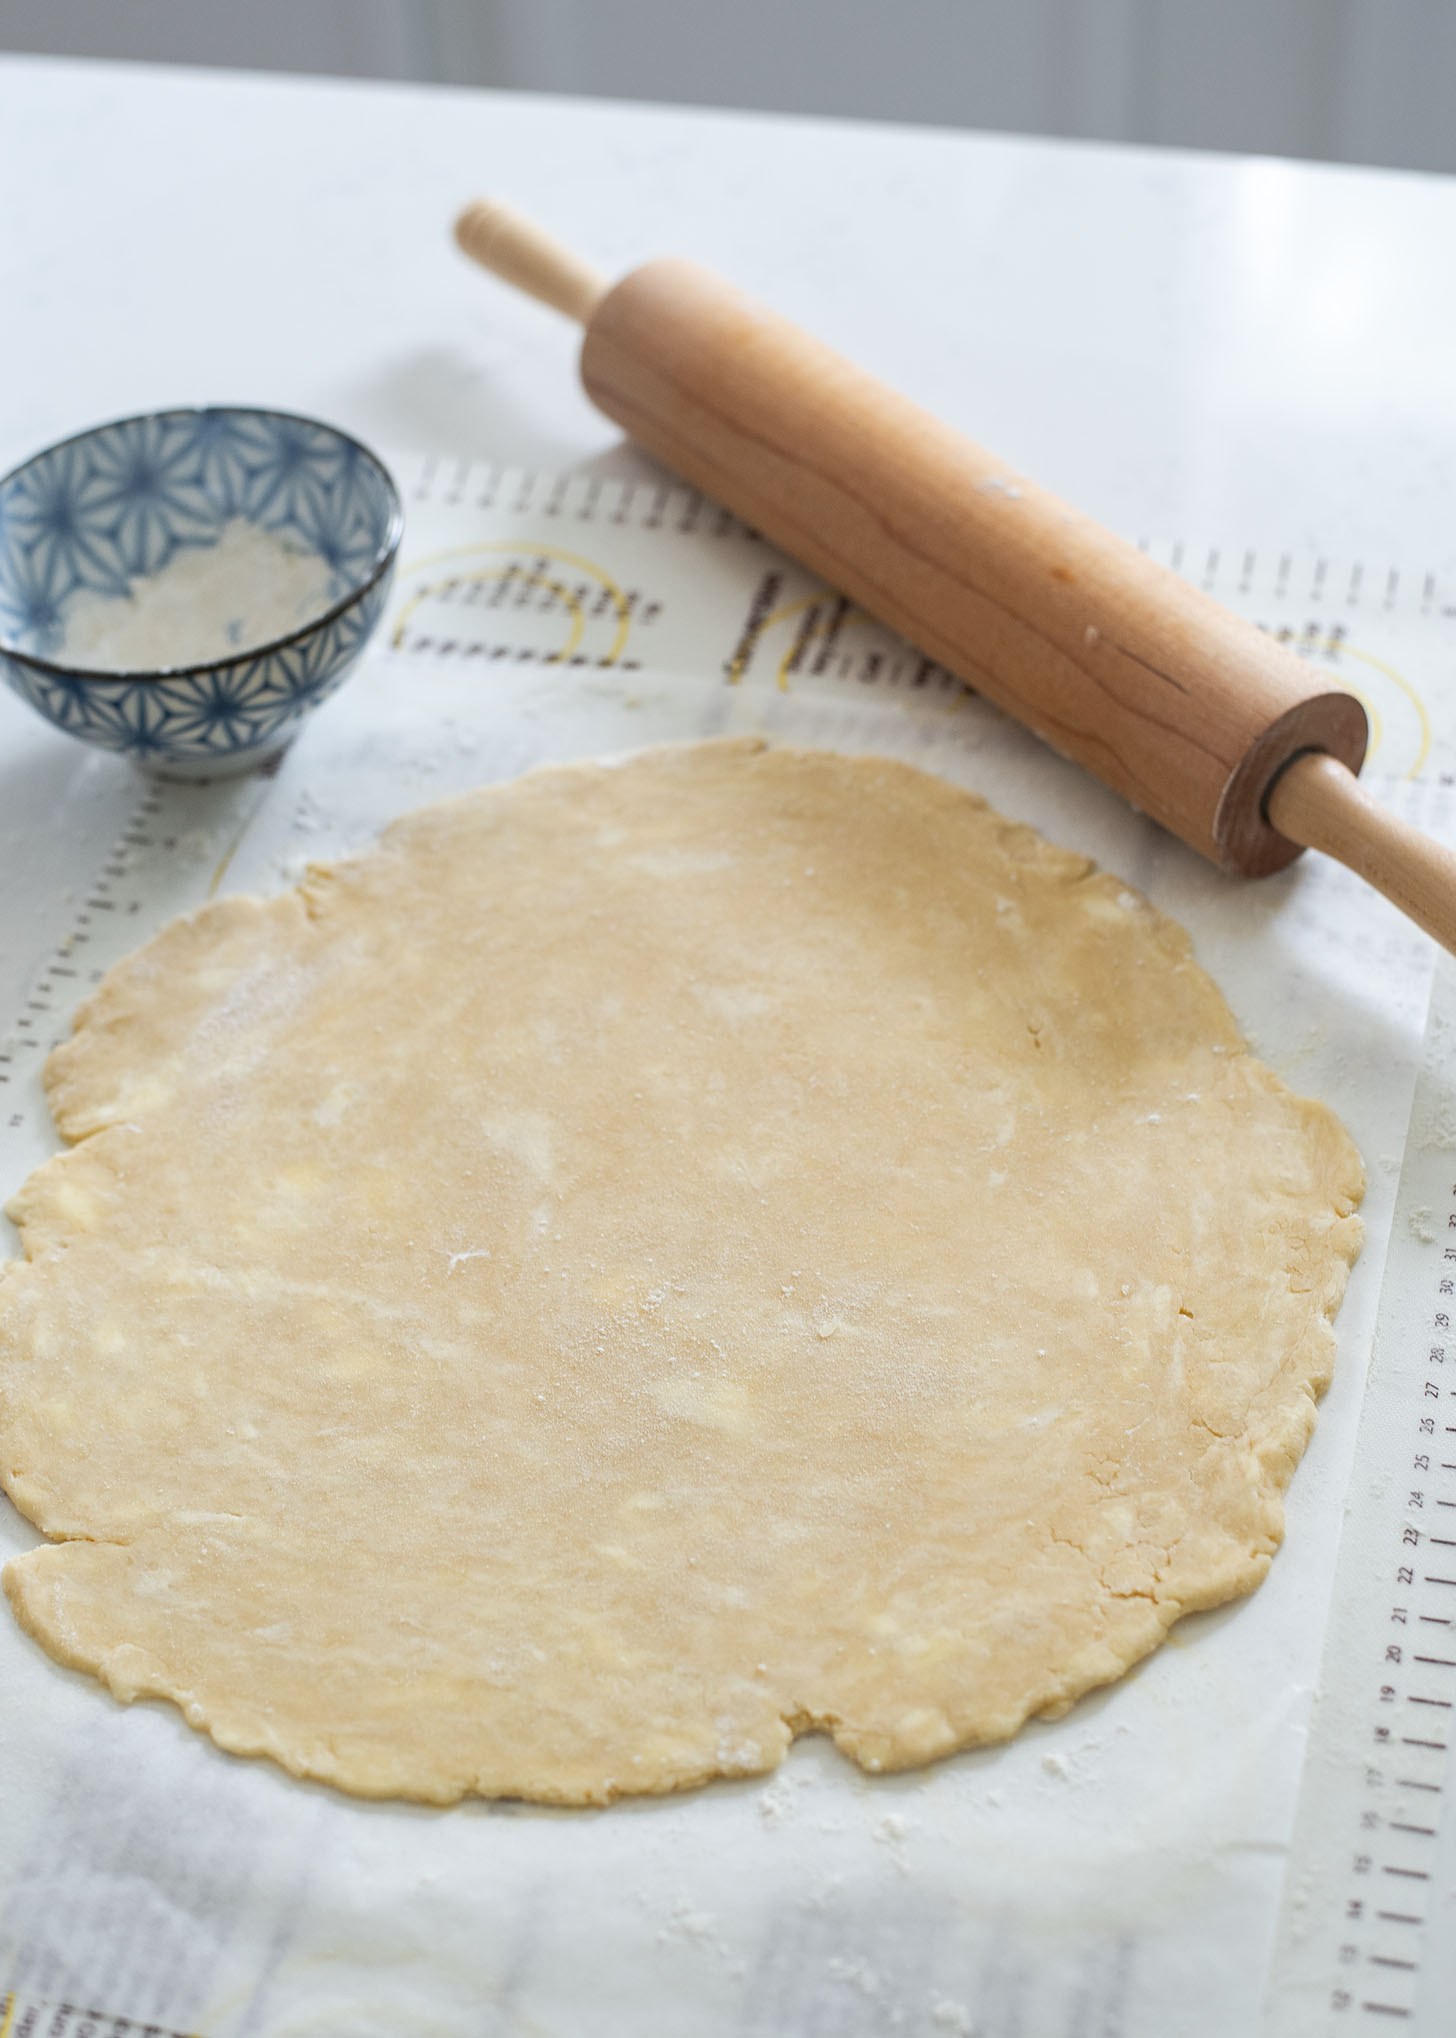
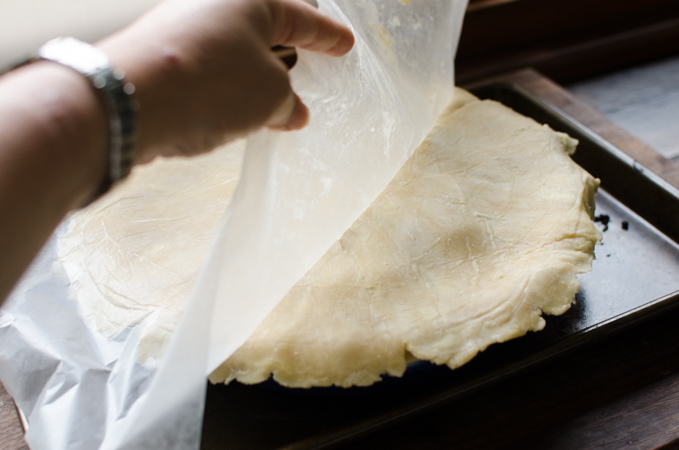
Roll the Crust. Work on a floured surface and keep the dough cold. If it softens, chill it briefly before fitting it into your deep dish pan. Cold dough = flaky layers.
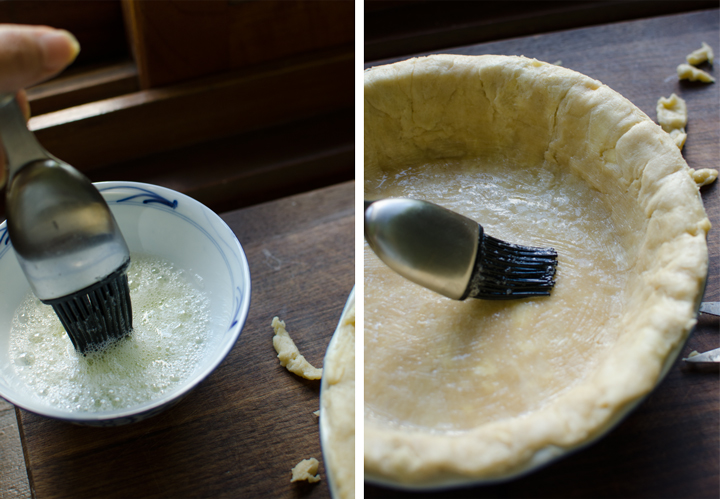
Tip to prevent the soggy pie crust bottom: Brush the bottom of the pie crust with the beaten egg white (if using). Then keep it in the fridge while you roll out the top crust.
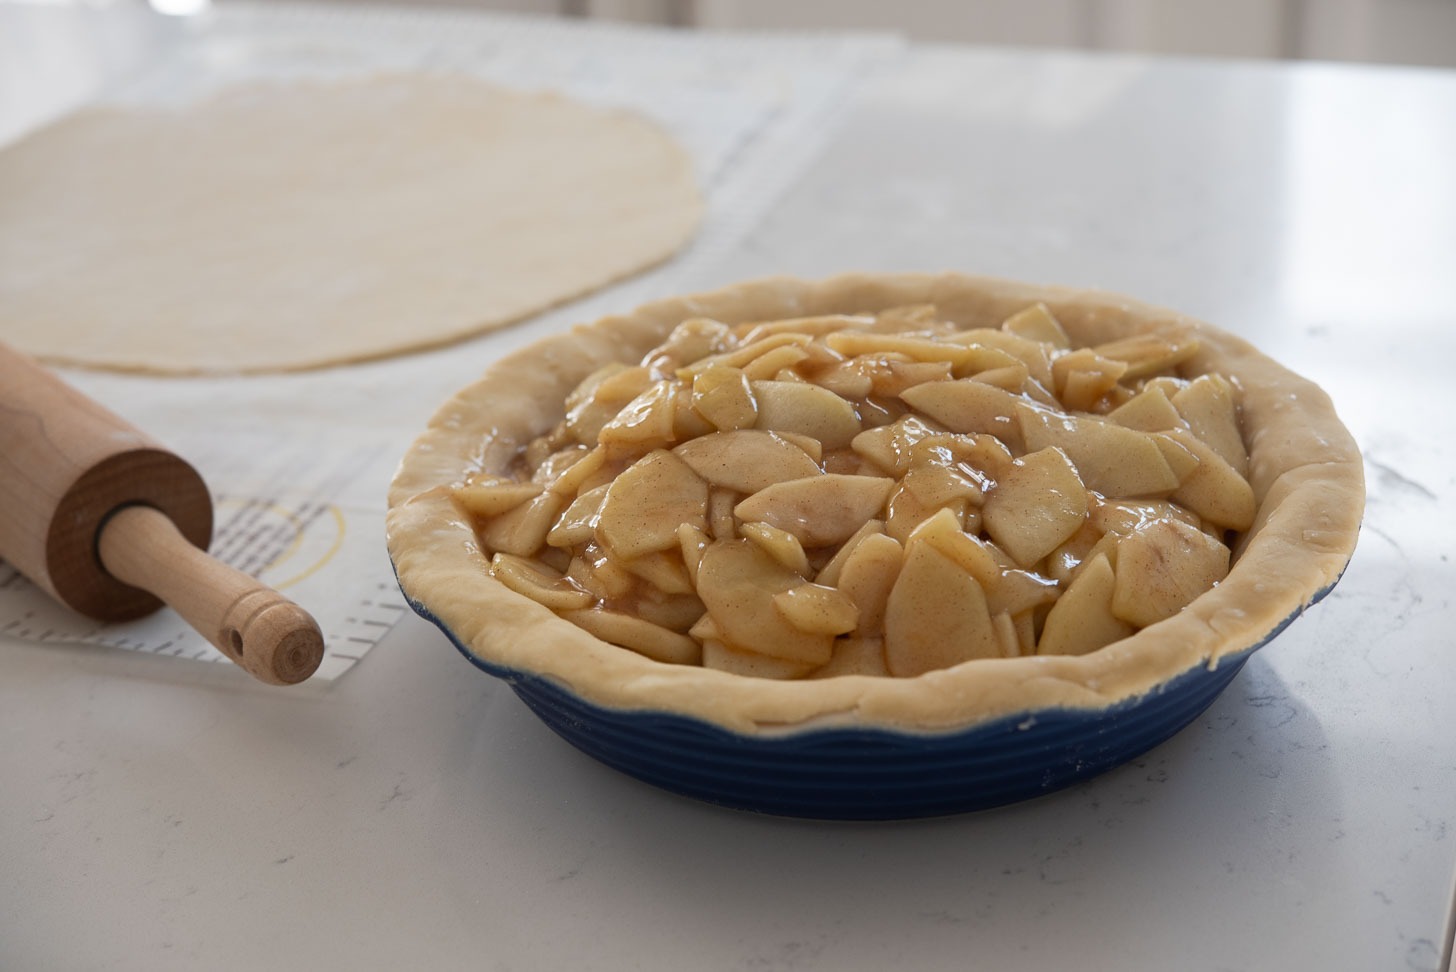
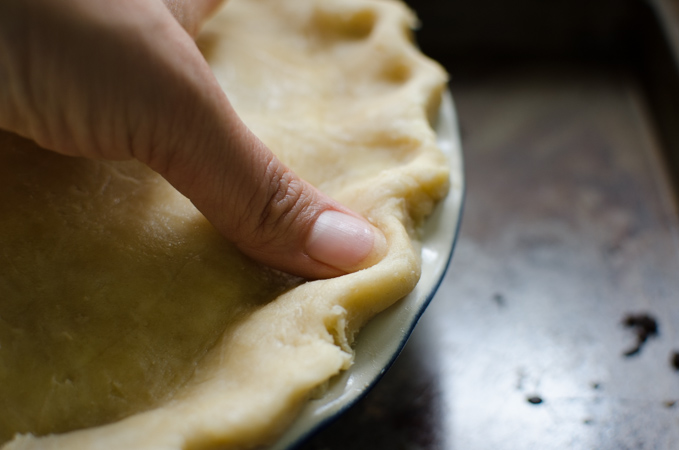
Assemble the Pie. Heap the cooled filling into the prepared crust. Don’t worry if it looks tall — it will settle as it bakes. Cover with the top crust and seal the edges.
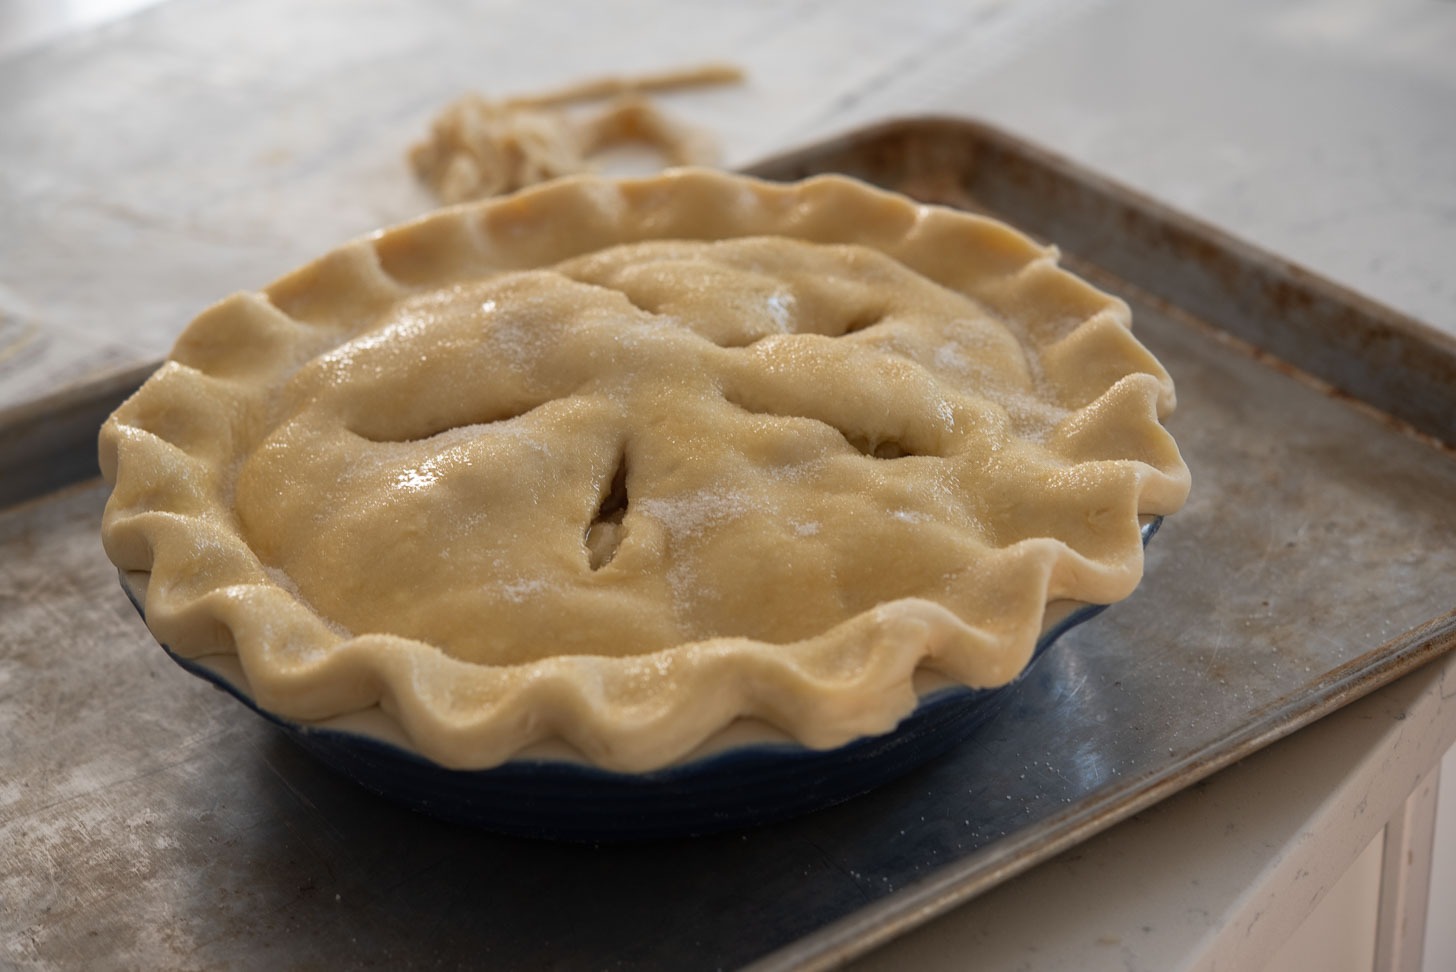
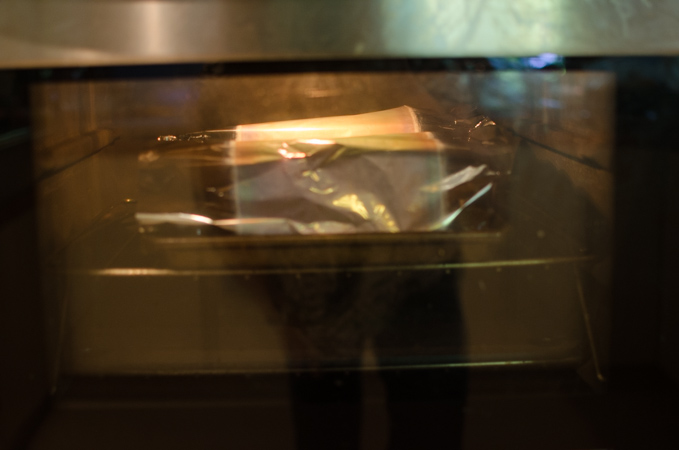
Top + Bake. Brush with egg wash and sprinkle sugar for sparkle. Cut a few slits to let steam escape. Bake until the crust is golden brown; tent with foil if it darkens too quickly. When done, let the pie cool on a wried rack.
Best way to Serve Apple Pie
Warm up a slice of this apple pie. In our house, it’s always paired with a scoop of vanilla ice cream — the hot-and-cold contrast makes it unforgettable.
Helpful Pie Baking Tips
Follow these tips for the best homemade pie experience.
- Lower your oven shelf to the bottom 1/3 or 1/4 position: Pies need a long baking time. And the higher the oven shelf is, the more browning occurs. If you bake the pie on the lower shelf, it prevents the top crust from browning too much.
- Place a large baking pan (lined with foil) underneath the pie pan to catch overflowing juice dropping – easy clean-up!
- If the top crust browns too much before it finishes the baking time, place a loose foil tent over the pie to prevent it from browning further.
- If you have a baking stone or baking steel, put it on the lowest rack of your oven, but not touching your baking pan directly. The heat from the baking stone (steel) will rise and cooks the bottom crust quickly, making it nice and crisp. Big difference!
Love this recipe? Rate it and share your experience in the comments below! On Instagram? Tag me to showcase your creation. For more delicious recipes, subscribe to our newsletter!
Old-Fashioned Deep Dish Apple Pie
Ingredients
- 1 homemade double pie crust, or your favorite pie crust recipe
- 3 to 3 1/2 lb (1.3 to 1.6 kg) baking apples, Use 3 different varieties of apples such as Granny Smith, Golden Delicious, Gala, Northern Spy, Jonagold, Honey Crisp, and Braeburn
- 1 tbsp (15 ml) fresh lemon juice
- 3/4 cup (150 g) sugar
- 1/3 cup (70 g) light brown sugar
- 1/4 tsp (1.5 g) salt
- 4 tbsp (32 g) cornstarch
- 3/4 tsp (2 g) cinnamon
- granulated sugar or sparkling sugar, for sprinkling
For the egg wash
- 1 large egg yolk
- 2 tsp (10 ml) water
Instructions
- Make the Homemade pie dough recipe and chill according to the instructions while preparing the filling. Adjust oven rack to bottom third position and preheat oven to 400˚F.
For the apple filling
- Peel, remove cores and thinly slice apples to make 12 cups in volume.
- In a large shallow pot or skillet, add the apple slices, and gently toss with lemon juice, granulated sugar, light brown sugar, salt, cornstarch, and cinnamon, until well combined.
- Cook over medium heat, stirring frequently, until apples are tender when poked with fork but still hold their shape, about 5 minutes. Let cool to room temperature, about 15-20 minutes.
To roll out the pie crust
- On a floured work surface, roll out one of the chilled pie dough disks (keep the other one in the fridge) to a 13-inch diameter. Roll out the other pie dough disk into a circle that is about a 12-inch diameter. This will be the top crust.Tip to prevent the soggy pie crust bottom: Brush the bottom of the pie crust with the beaten egg white (if using). Then keep it in the fridge while you roll out the top crust.
To bake the apple pie
- Reclaim the bottom crust from the fridge and put the cooled apple filling on it. Cover the pie filling with the top crust. Trim or arrange the loose crust around the edge of pie pan. Crimp or flute the edges to seal.
- Lightly brush the top crust with the egg wash. Sprinkle the top with granulated sugar or sparkling sugar. Cut a few slits on the top to allow steam to escape during baking.
- Put the pie on a spacious baking sheet and bake for a total of 60 minutes until it turns golden brown. Around 40 minutes into baking, inspect the pie crust for excessive browning. If the top browns too quickly, cover loosely with foil during the last 20 minutes.
- Allow the pie to cool to room temperature, about 2-3 hours before serving. This will allow the filling to thicken up. Serve your pie with vanilla ice cream.
I have made apple pies for years – I have never precooked the apples. I’m always concerned about the apples being too mushy. How do you stop that from happening?
You can skip pre-cooking the apples and bake them with the crust immediately. However, this might create a hollow gap between the filling and the top crust. Although I’ve never found the apple filling to be mushy with this recipe, if you prefer the filling to have a crispier bite, try simmering the apple slices for less time than the recipe calls for. That should help.
This is by far the best crust and apply pie recipe. I’ve tried multiply pic crust recipes and this one wins hands down…won’t be trying any other recipes. The apple filling was phenominal. Never have to search for a recipe again. Thank You!
Hi Debbie
I am so happy to hear that you loved this recipe. Your comment means a lot to me. Thank you so much!
It’s Thanksgiving this week so I am back here making your fantastic apple pie!!
Happy Thanksgiving to you and your family!
Tamar
Thank you, Tamar. Happy Thanksgiving to you, too!
Hi Holly
Am making this fantastic pie again for Perfect Pi Day today. Yum!!!
Hi Tarmar
It is wonderful to hear that you like this apple pie. It is my husband’s favorite and everyone who tasted it raved. Have a fun on making. Happy perfect pie day!
Holly, you`re making my drool! Apple pie is seriously my favorite kind of pie. I wish I had a deep dish pie pan to make this! Your crust sounds fantastic! I definitely want to try making it one day.
Oh my goodness, this pie is gorgeous!! I seriously need to make pie more often.
I took this pie to a dinner tonight. I was amazed at how flaky and tender the crust was. Without a doubt the best crust I have ever produced.
I enjoyed experiencing the different scent and texture of each type of apple as I worked.
One quibble – I wish I had known how many apples make 12 cups – I overestimated and have enough for at least two more pies. On second thought, is this really a problem? Two more delicious pies….. 🙂
Apple pie is one of my favorites! And you’ve made a good one — terrific recipe, really nice pictures. Thanks so much.
thank you for this recipe. I never seem to go wrong with your recipes, they are always a hit. But I was deciding which apple pie recipe to use, you posted in the nick of time. I will be using your recipe. I have made your pumpkin bundt cake about 4 times since your posting; absolutely divine. you said it right when you said that you think the spices are a perfect blend; they are a perfect blend for me too. Thank you thank you.
So glad that you liked my pumpkin bundt cake. Hope your pie will turn out great. Let me know how it goes. Love to hear from you again.
I substituted “maple extract” for maple syrup. I didn’t want to purchase a whole bottle of syrup that my family may not eat and I wanted my frosting to be that golden brown color, and that rich maple flavor. It turned out great, but with the cream cheese, I could never get my frosting to drizzle like yours, either too thick like frosting, or too runny, I had a hard time getting it to set up when it was so thin. Maybe you poured yours on a hot out of the oven cake? Suggestions?
Hi d
I use about 4 tablespoons of maple syrup in the glaze and that helps to thin out the cream cheese. I am not sure you can use that much of amount with the maple extract to thin out the glaze. If the glaze seems too thick, I would add milk a little bit at a time to reach to the right consistency. Also make sure your cream cheese is in room temperature to be soft. Cool your bundt cake completely before you drizzle the glaze.
I hope you can give it another shot. It is a really lovely cake with the full of autumn flavor.
Terrific apple pie. The recommended combination of apples was perfect.